Craving indulgence but chasing gains? You’re not dreaming—these 25 high-protein meals pull off the cheat-meal vibe while delivering serious nutrition. Think crispy textures, gooey fillings, and flavors that scream “treat,” all while keeping protein front and center. FYI, you can have your cake (protein) and eat it too, with fewer compromises than you expect. Seriously, these will surprise you.
We’re cutting through the boring “chicken and broccoli” stereotype with crave-worthy bites that look like splurges but actually support your goals. If you’ve ever felt conflicted between comfort food and your macros, you’re about to get a lineup that feels like a cheat, but cooks like a champion. Ready to dive into flavor-town without derailing your plan? Let’s go.
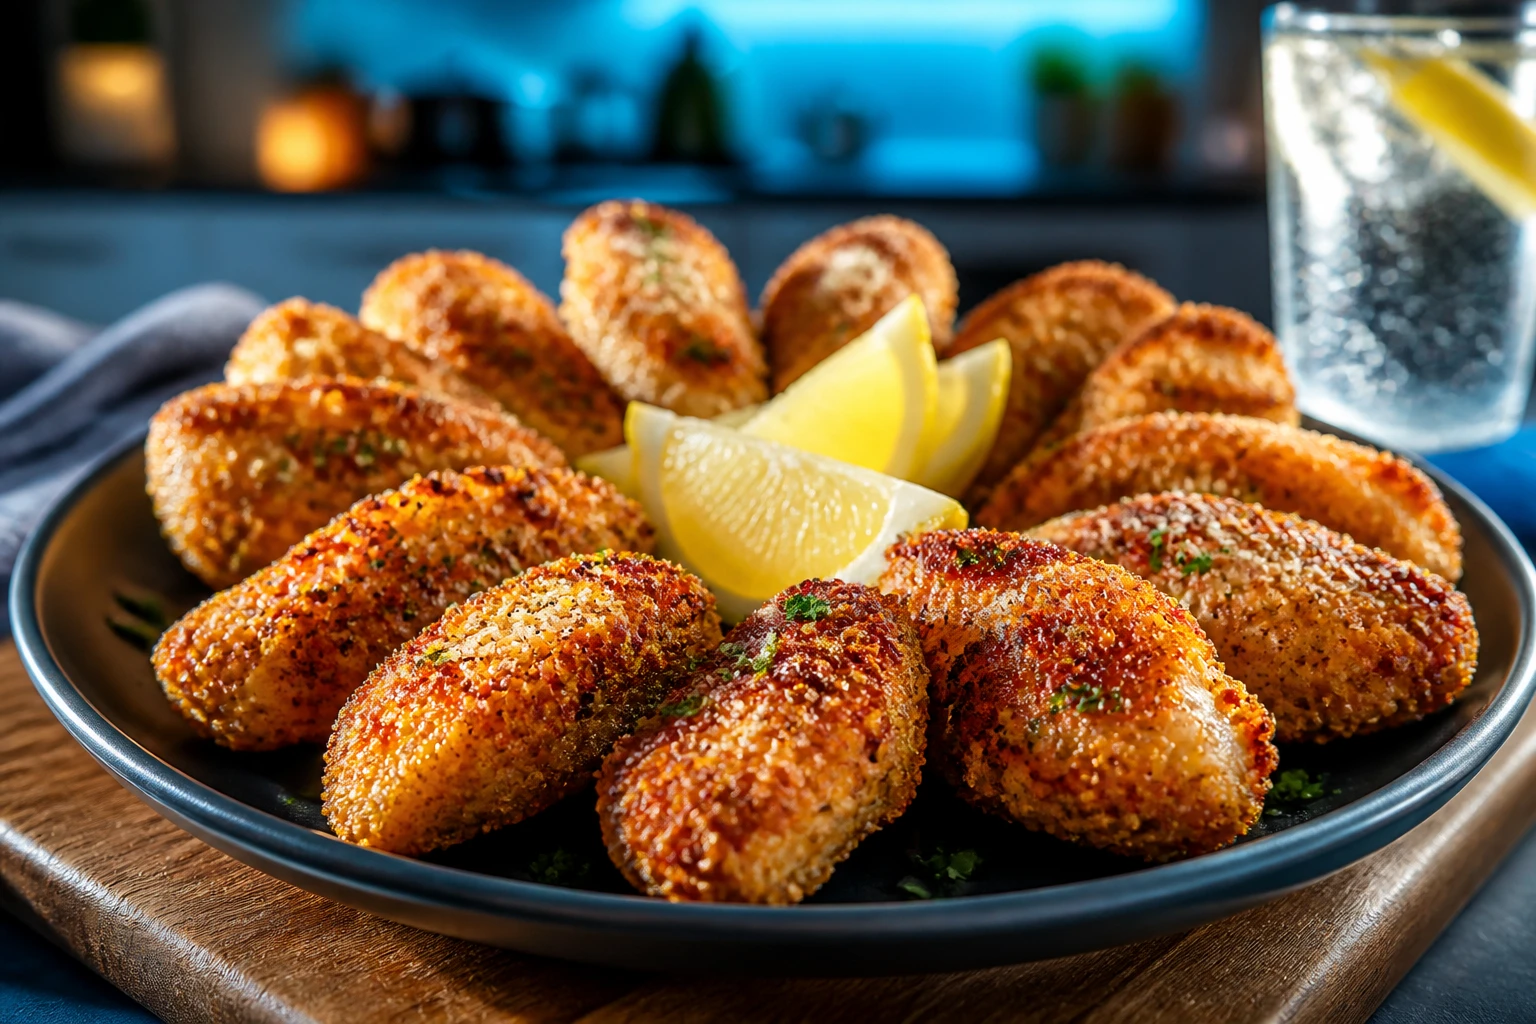
1. Crispy Parmesan-Lemon Chicken Bites That Fool Your Taste Buds

Picture perfect little morsels that crunch when you bite, with a bright lemony zing and that cheesy parmesan kiss. These bites become crowd-pleasers at weeknight dinners or game-day spreads. They’re deceptively light yet satisfying, and you won’t believe how the coating stays crisp even after reheating. Trust me, you’ll be reaching for seconds, then thirds.
Why You’ll Love It
-
<li Crisp exterior with juicy interior.
<li High protein per serving for post-workout satisfaction.
<li Quick to prep and bake, no deep-frying mess.
<li Fabulous serve-with-dip potential for parties.
<li Zesty, bright flavor that cuts through heavy sides.
<li Freezer-friendly for easy meal-prep days.
Ingredients
- 1 lb chicken breast, cut into bite-sized pieces
- 1/2 cup whole-wheat breadcrumbs
- 1/4 cup grated parmesan
- 1 tsp lemon zest
- 1 egg, beaten
- 2 tbsp olive oil
- Salt and black pepper, to taste
- Juice of 1/2 lemon
- Fresh parsley, chopped (for garnish)
Instructions
- Preheat oven to 425°F. Line a sheet pan with parchment for extra crispiness.
- Mix breadcrumbs, parmesan, lemon zest, salt, and pepper in a shallow dish.
- Dip each chicken piece first in beaten egg, then coat with crumb mixture.
- Arrange on the sheet pan, drizzle with olive oil, and bake 12-15 minutes until golden.
- Brush with lemon juice while hot for extra zing.
- Finish under the broiler for 1-2 minutes if you want extra crunch.
Pro Tips
-
<li For extra juiciness, brine chicken pieces in salted water for 15 minutes before coating.
<li Use Panko if you want maximum crunch without deep-frying.
<li Serve with a yogurt-lemon Dip for tang and creaminess.
Easy Variations
-
<li Swap parmesan for nutritional yeast for a vegan-friendly version (still high-protein if using fortified eggs or protein batter).
<li Add a pinch smoked paprika for a BBQ twist.
<li Use turkey breast instead of chicken for a different taste profile.
Mistakes To Avoid
-
<li Overcrowding the pan; this steams instead of crisping.
<li Not drying the chicken well before coating, which prevents crust adhesion.
<li Skipping the lemon finishing step—adds brightness you’ll miss.
Serving Ideas
- Serve with a cucumber-dill yogurt sauce for contrast.
- Pair with a crisp salad or roasted veggies.
- Great as a party app with skewers and a zingy dip.
2. Protein-Packed Tacoshare Crisps That Look Like Nachos
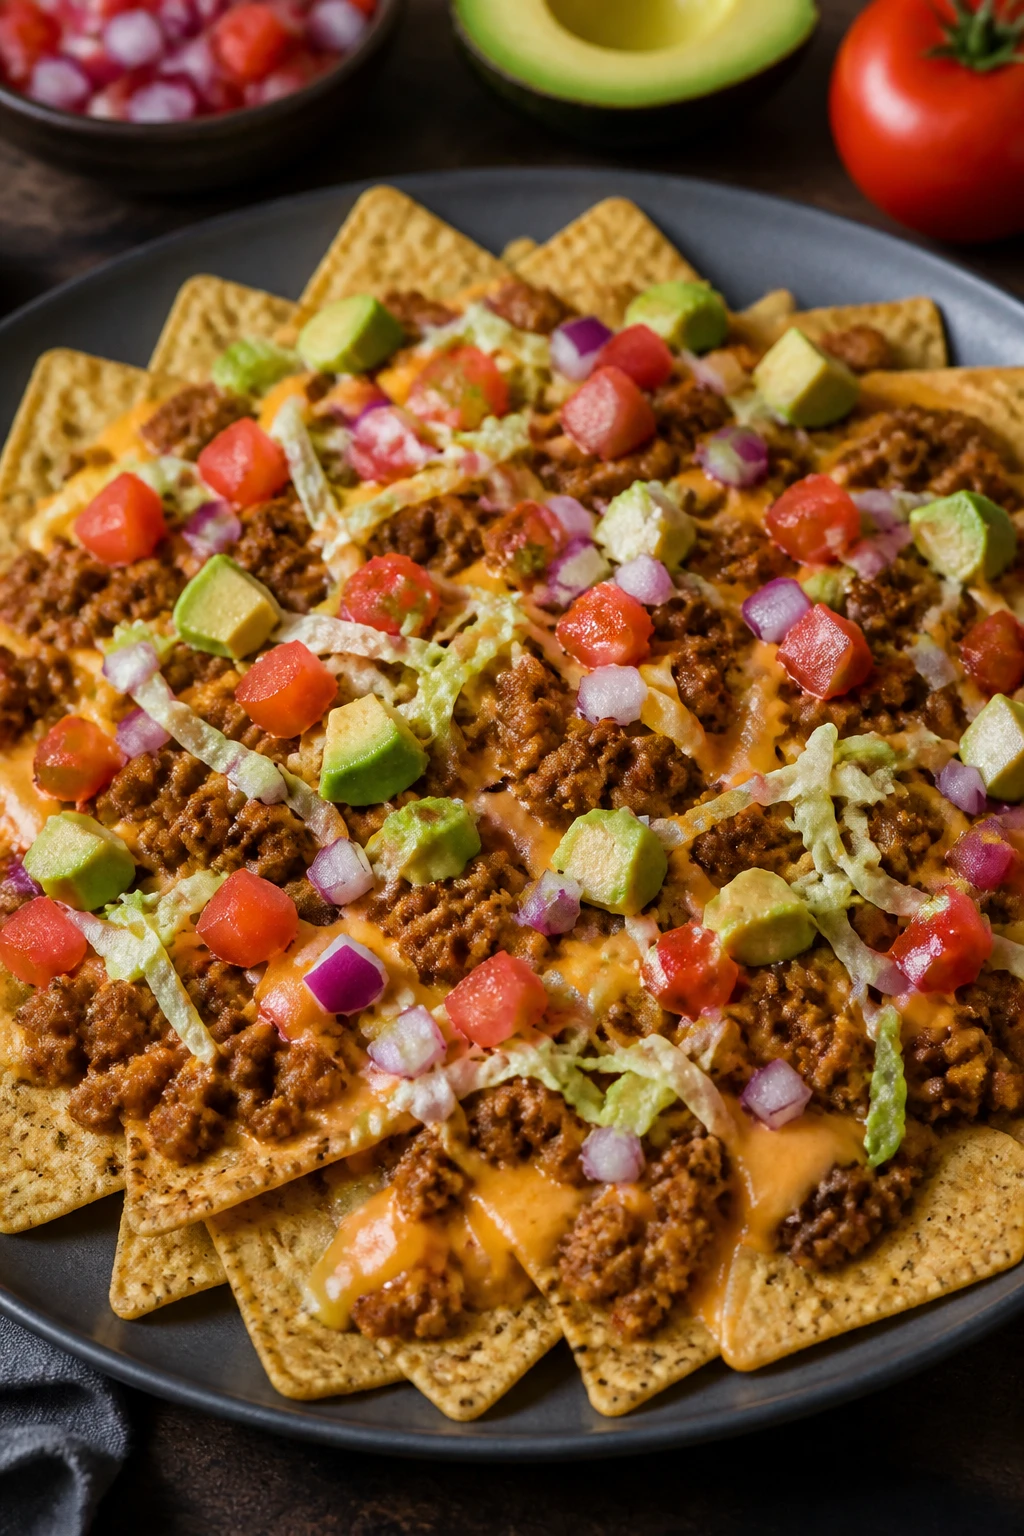
The idea is simple: crunchy, cheesy, protein-forward bites that resemble a cheat-night nacho platter but keep your macros intact. Each crisp carries a punch of spice, with ground turkey or lean beef doing the heavy lifting. You’ll hear crunch, then a satisfying melt as cheese blends with peppers and onions. Low effort, big payoff.
Why You’ll Love It
-
<li Crunchy, snackable, shareable.
<li Protein-forward base with controlled carbs.
<li Versatile topping options to suit any mood.
<li Bakes in one sheet for minimal cleanup.
<li Kid-friendly with a grown-up kick for adults.
<li Great for a party or game night snack attack.
Ingredients
- 1 lb lean ground turkey or beef
- 1 small onion, diced
- 1 bell pepper, chopped
- 1 cup shredded cheddar or Monterey Jack
- 1/2 cup black beans, rinsed (optional)
- 1 packet taco seasoning
- 1 cup baked tortilla chips or cassava chips
- Salsa and Greek yogurt for dipping
Instructions
- Sauté onion and pepper until soft; add meat and cook through with taco seasoning.
- Spread chips on a large sheet pan; spoon meat mixture evenly over the chips.
- Top with beans and cheese; bake at 400°F for 8-10 minutes until cheese melts.
- Serve with salsa and a dollop of yogurt for creaminess.
- Garnish with cilantro for fresh flair.
- Optional: drizzle with a smoky chipotle sauce for extra depth.
Pro Tips
-
<li Use a mix of cheeses for flavor complexity.
<li Pre-crisp the chips slightly before topping for extra crunch.
<li Don’t overload with toppings to keep it crispy.
Easy Variations
-
<li Swap turkey with shredded chicken for lighter texture.
<li Use crumbled queso fresco for a milder, creamy bite.
<li Add jalapeños for heat lovers.
Mistakes To Avoid
-
<li Overloading the pan; soggy bottom chips ruin the vibe.
<li Skipping the bake time; cold cheese = meh.
<li Using plain chips—opt for a darker, sturdier chip.
Serving Ideas
- Top with fresh lime juice and a dash of hot sauce.
- Pair with a zesty corn salad for balance.
- Leftovers are great as a taco filling later in the week.
3. Black-Bean Salmon Cakes That Taste Like a Fancy Burg
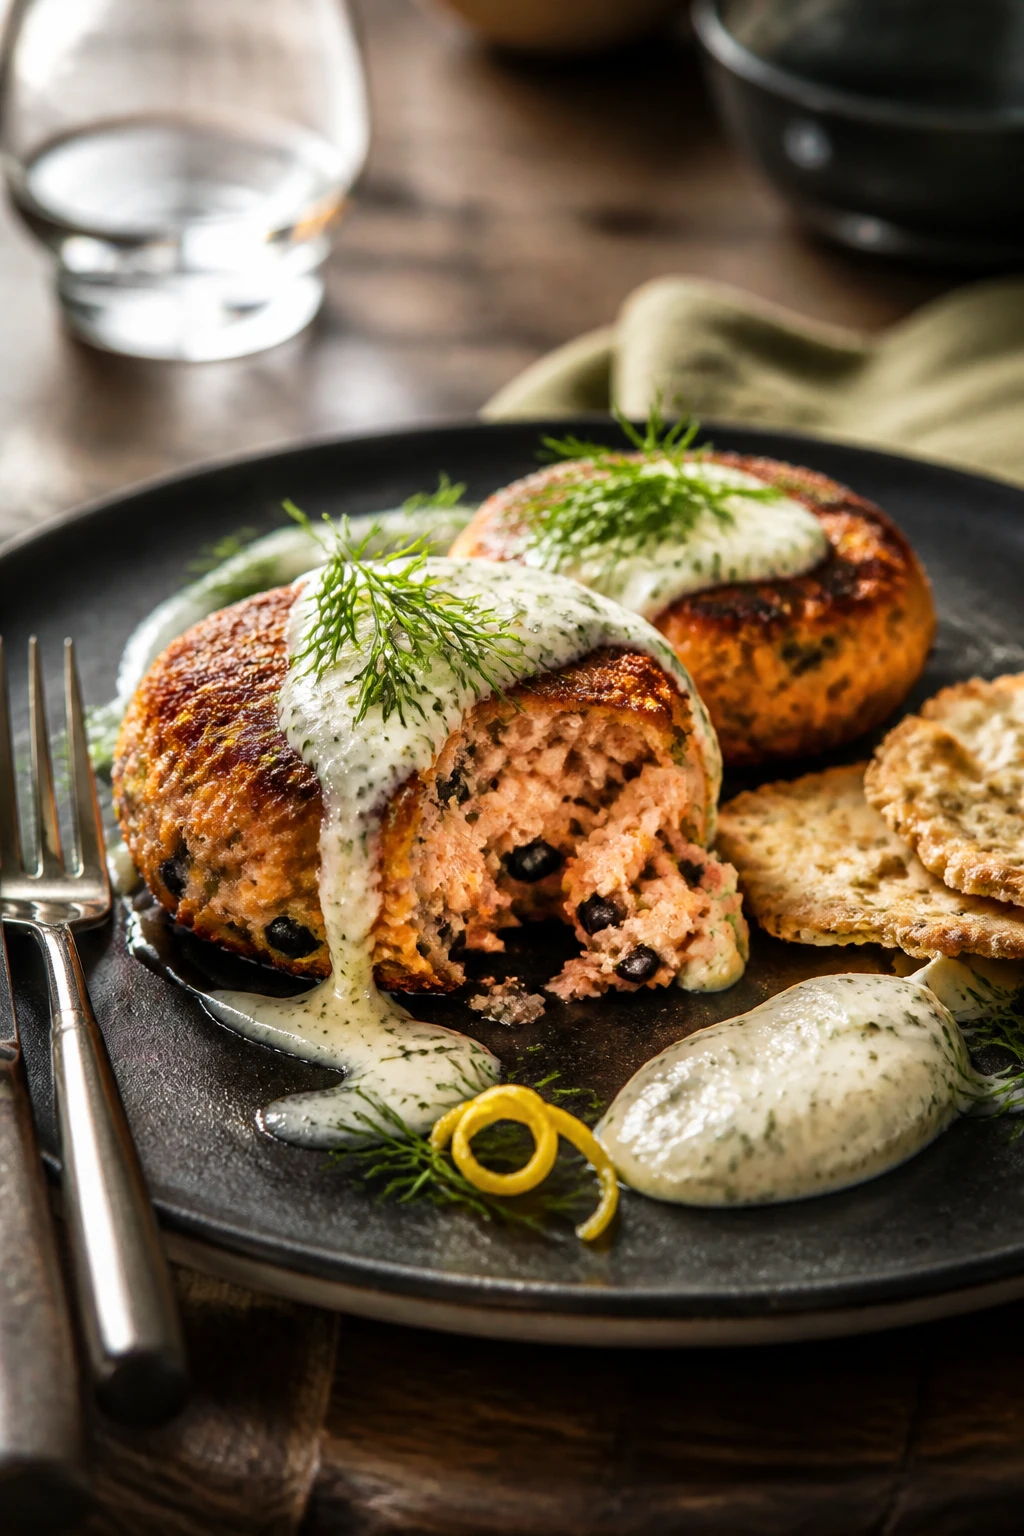
If you think fish can’t feel indulgent, think again. These salmon cakes are a protein powerhouse with a fluffy interior and a crispy edge, all crowned with a creamy herby sauce. They feel like a spa day for your taste buds but technically count as a weeknight hero. You’ll want them on rotation after the first bite.
Why You’ll Love It
-
<li High-protein seafood option with fiber-rich beans.
<li Delicate inside, crisp outside—textural tug-of-war done right.
<li Sauce brings brightness without heaviness.
<li Freezer-friendly for batch cooking.
<li Elegant enough for date night, simple enough for busy days.
<li Naturally gluten-free if prepared with gluten-free breadcrumbs.
Ingredients
- 1 can (14 oz) pink salmon, drained
- 1/2 cup black beans, mashed
- 1 egg
- 1/4 cup breadcrumbs
- 1 tbsp Dijon mustard
- 1 tbsp chopped dill
- 1 tsp lemon zest
- Salt and pepper
- Olive oil for frying
Instructions
- Mix salmon, beans, egg, breadcrumbs, mustard, dill, lemon zest, and seasoning in a bowl.
- Form into 6 patties and chill 15 minutes to set the shape.
- Heat oil in a skillet over medium heat; cook patties 3-4 minutes per side until golden.
- Rest on a rack to keep them crisp.
- Serve with a yogurt-dill sauce.
- Finish with a squeeze of lemon before the first bite.
Pro Tips
-
<li Chill helps maintain shape—don’t skip it.
<li Add a dab of hot sauce to the sauce for a kick.
<li Use panko if you want extra crunch.
Easy Variations
-
<li Use canned tuna instead of salmon for a budget-friendly option.
<li Swap dill for parsley and capers for a new flavor profile.
<li Bind with mashed potatoes for a different texture.
Mistakes To Avoid
-
<li Overmixing the patty mixture, which makes them dense.
<li Not patting patties dry; moisture prevents crust formation.
<li Skipping the sauce—these need a little creaminess to shine.
Serving Ideas
- Toast a brioche bun for a salmon burger vibe.
- Pair with lemony arugula salad.
- Top with pickles for tang and crunch.
4. Creamy Tuna Satay Lettuce Cups That Wow
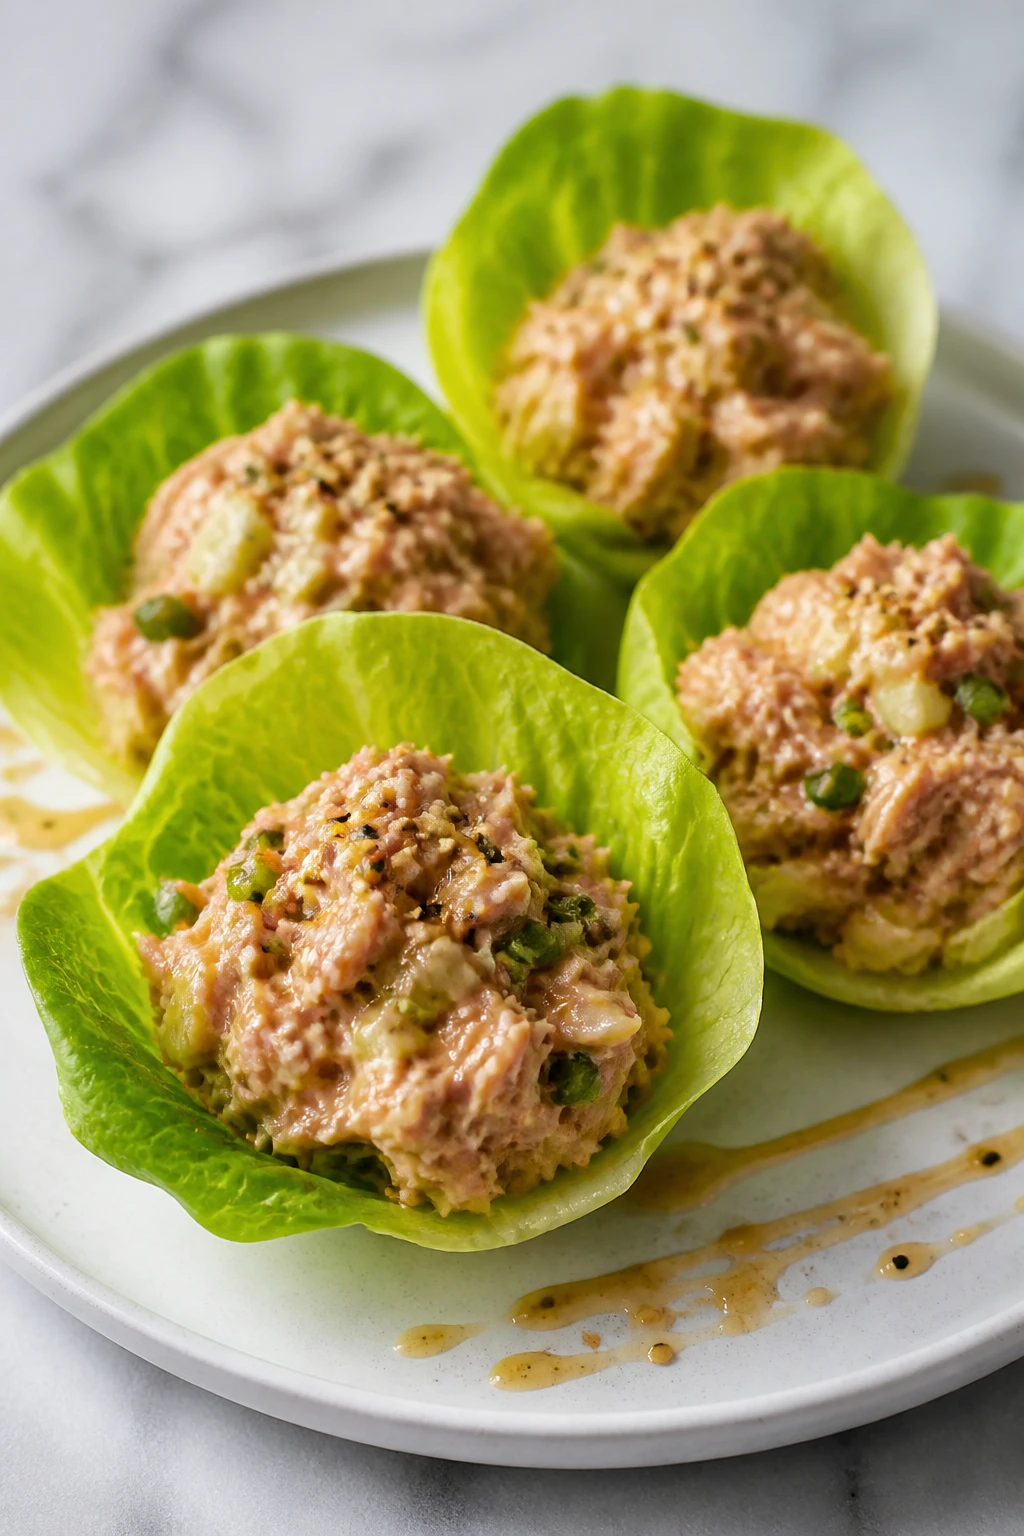
A surprising cheat-meal look with a protein punch: creamy tuna, a whisper of peanut, and crisp lettuce cups. It tastes like a fancy eat but comes together in minutes. It’s the kind of dish you pull off when friends drop by and you want something “wow” without sliding into takeout chaos.
Why You’ll Love It
-
<li Light yet protein-packed bite-sized cups.
<li Creamy, satisfying texture without heaviness.
<li Quick assembly for last-minute meals or entertainings.
<li Naturally low carb with crunchy freshness.
<li Fun interactive eating experience.
<li Versatile toppings to customize to mood.
Ingredients
- 1 can tuna in water, drained
- 2 tbsp light mayonnaise
- 1 tsp creamy peanut butter
- 1 tsp soy sauce
- 1 tsp lime juice
- 1 garlic clove, minced
- 1 head butter lettuce, leaves separated
- Chopped cilantro and crushed peanuts for garnish
Instructions
- In a bowl, mix tuna, mayo, peanut butter, soy, lime, and garlic until creamy.
- Spoon a dollop into each lettuce leaf and fold into cups.
- Garnish with cilantro and peanuts for crunch and aroma.
- Chill 5 minutes if you like the filling cooler.
- Serve with lime wedges for a bright finish.
- Provide extra napkins—this gets a little messy in the best way.
Pro Tips
-
<li Use crunchy peanut butter for texture contrast.
<li Add a pinch of chili flakes if you want heat.
<li If you’re unsure about the texture, whip the tuna a bit more for silkiness.
Easy Variations
-
<li Swap tuna for shredded chicken in a curry-lime version.
<li Use Greek yogurt to lighten the mayo and introduce tang.
<li Add shredded carrot for color and sweetness.
Mistakes To Avoid
-
<li Filling too much—lettuce cups will split.
<li Not drying lettuce leaves properly; moisture breaks the filling.
<li Over-seasoning with soy; balance is key.
Serving Ideas
- Set on a platter with cucumber ribbons for a refreshing contrast.
- Pair with a crisp, cold beer or sparkling water with lime.
- Make it a party starter with a variety of dips.
5. Garlic-Lemon Shrimp Tacos That Taste Like a Beach Vacation
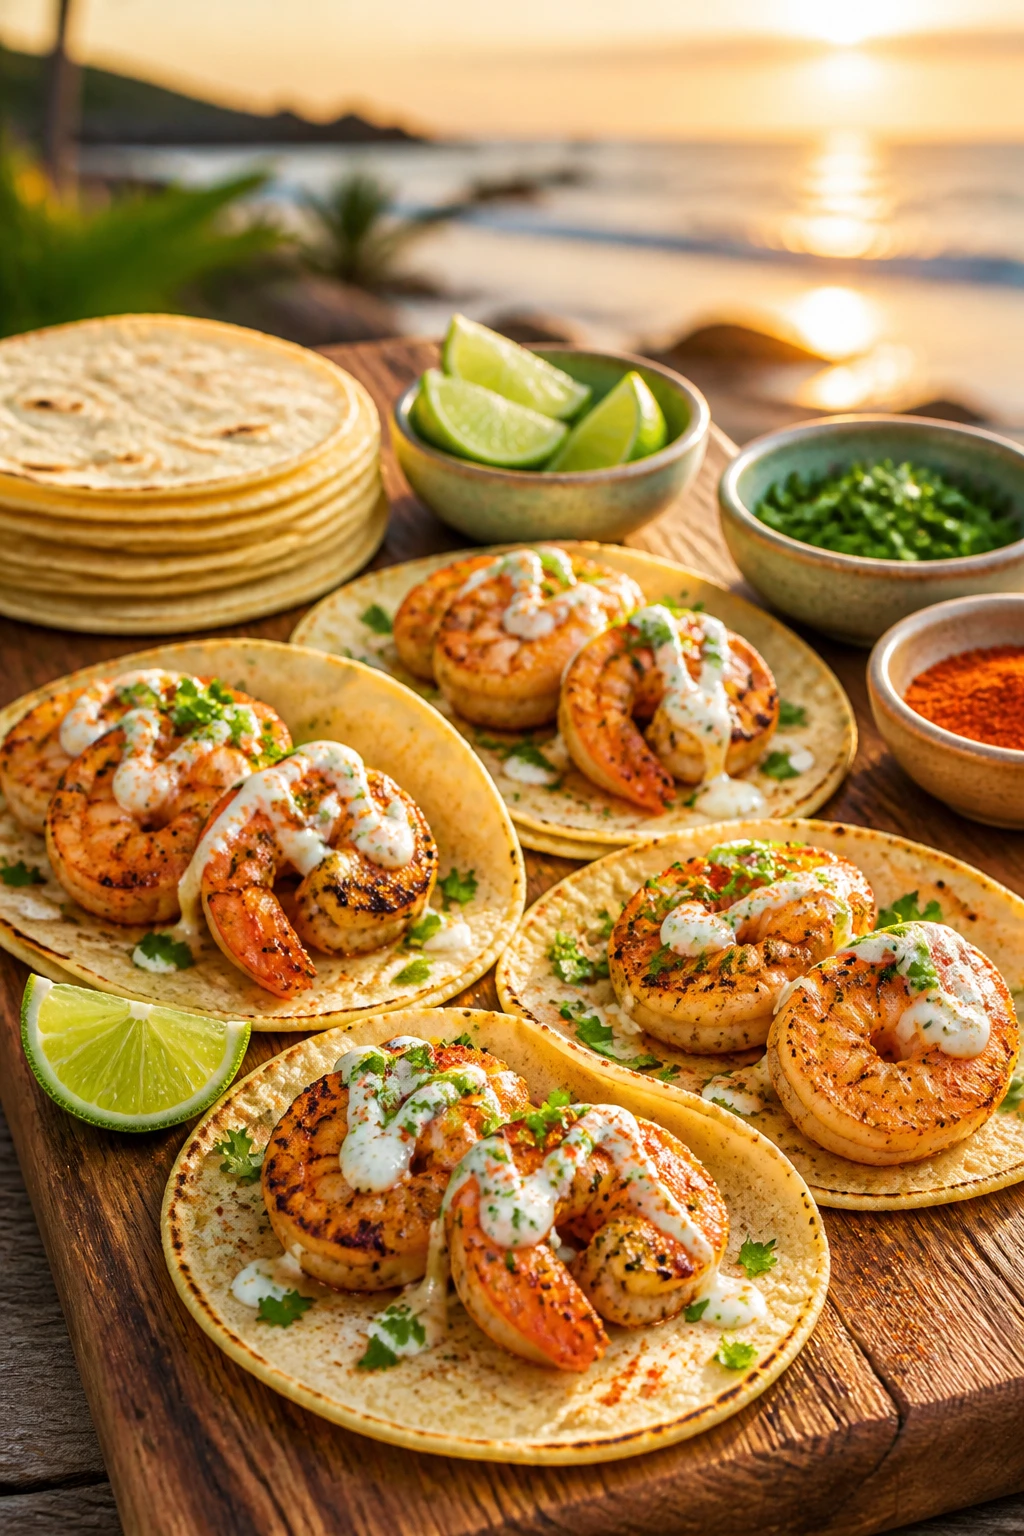
Imagine shrimp that’s tender, a touch of char, and a zippy garlic-lemon crema. These tacos bring a vacation vibe while packing protein to fuel your workouts. They’re fast, vibrant, and perfect for a weeknight or a Friday-night celebration. The aroma alone will lure your crew to the kitchen.
Why You’ll Love It
-
<li Bright citrus notes lift the entire dish.
<li Shrimp cooks in minutes, perfect for busy days.
<li Protein-packed with lean seafood.
<li Creamy crema adds indulgence without heaviness.
<li Simple, scalable for crowds or solo dinners.
<li Great as a meal-prep option for the week ahead.
Ingredients
- 1 lb shrimp, peeled and deveined
- 1 tsp paprika
- 2 cloves garlic, minced
- 1 tbsp olive oil
- 8 small corn tortillas
- 1/2 cup Greek yogurt
- 1 tbsp lime juice
- 1/4 cup cilantro, chopped
- Salt and pepper to taste
Instructions
- Toss shrimp with paprika, garlic, salt, and pepper.
- Cook in a skillet with olive oil 2-3 minutes per side until pink and opaque.
- Whisk yogurt with lime juice and a pinch of salt to make crema.
- Warm tortillas, fill with shrimp, top with crema and cilantro.
- Squeeze extra lime over top before serving.
- Want extra crunch? Add shredded cabbage as a topper.
Pro Tips
-
<li Don’t overcook shrimp or they turn chewy; pull as soon as pink.
<li Use corn tortillas for authentic texture and taste.
<li Quick-cest of cilantro gives a fresh aroma that rivals any beach breeze.
Easy Variations
-
<li Replace shrimp with scallops for a luxurious bite.
<li Add avocado slices for creaminess.
<li Swap lime crema for a zesty avocado-cilantro sauce.
Mistakes To Avoid
-
<li Skipping a warm tortilla—cold tortillas break easily.
<li Overloading crema; it hides the shrimp flavor.
<li Not patting shrimp dry; moisture causes splatter and soggy tortillas.
Serving Ideas
- Pair with a pico de gallo or mango salsa for brightness.
- Serve with salted diced radishes for crunch and color.
- Offer a lime wedge station for guests to customize.
6. Turmeric Chicken Apple Sliders That Beat Your Local Bar Scene
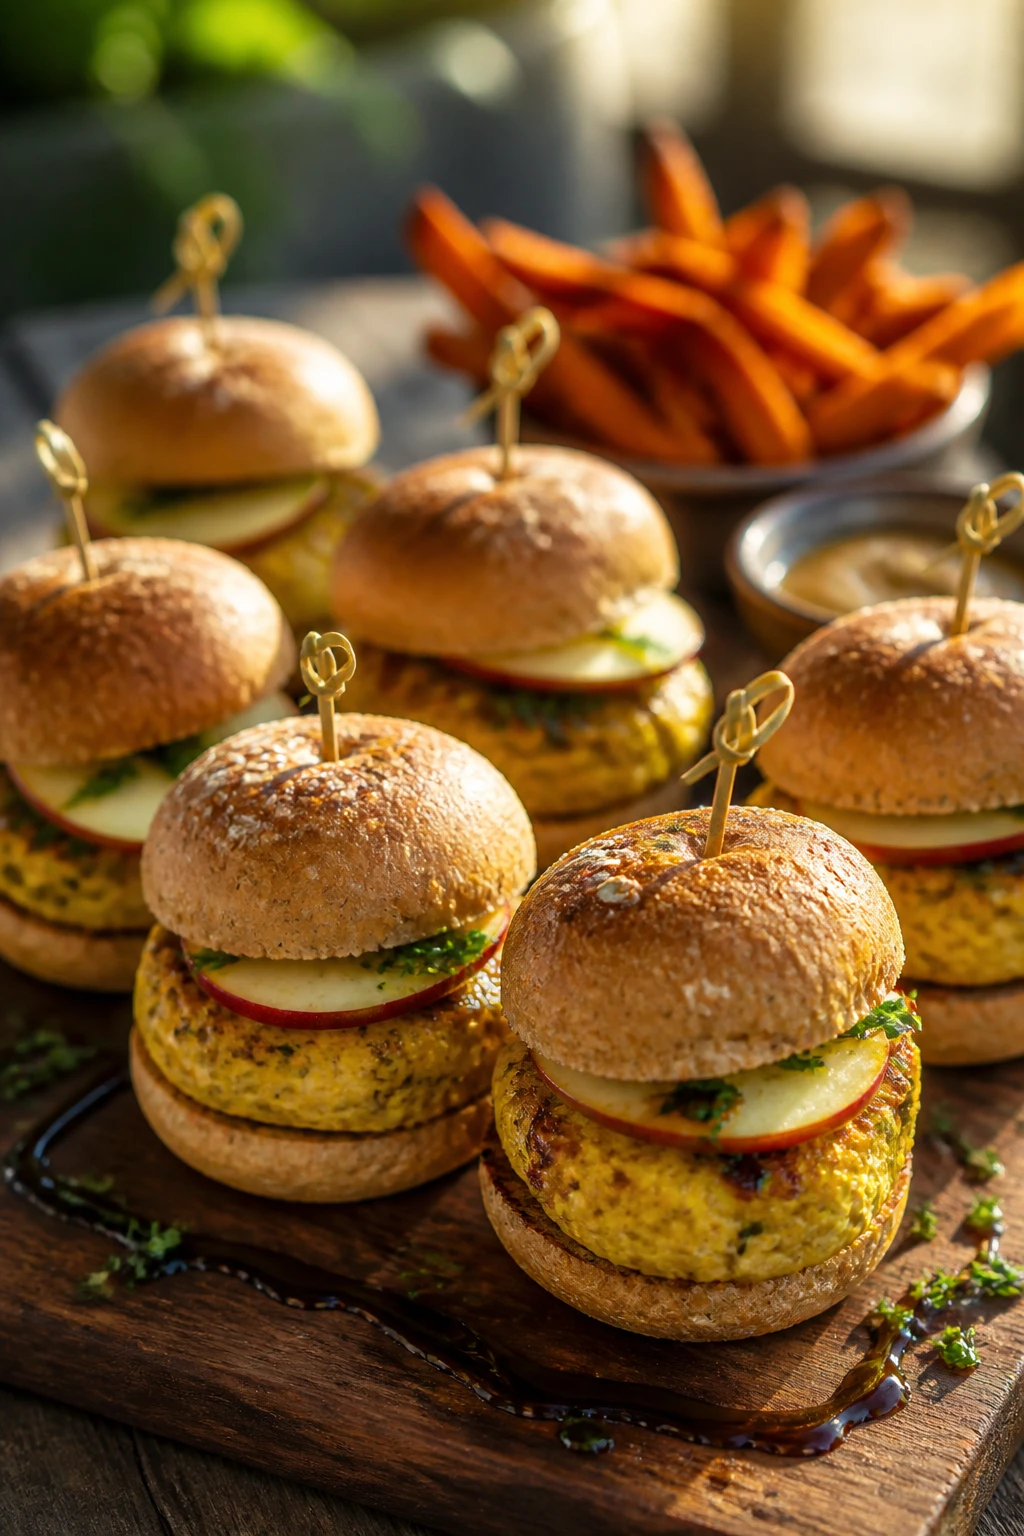
Juicy little sliders with a warm spice kick and a sweet apple crunch—these feel indulgent but stay lean. The turmeric marinade gives a sunny color and a gentle earthy note that deepens as they rest. They’re great for meal-prep lunches or a playful dinner with a side of sweet potato fries.
Why You’ll Love It
-
<li Vibrant color without artificial dyes.
<li Juicy texture bursting with flavor in every bite.
<li Sweet-treshing apple bits add contrast and crunch.
<li Simple, scalable, and crowd-pleasing.
<li Works well as a party appetizer or a full slider meal.
<li Leftovers reheat beautifully for lunches.
Ingredients
- 1 lb ground chicken
- 1 tsp turmeric
- 1/2 tsp cumin
- 1 apple, finely diced
- 1/4 cup breadcrumbs
- 1 egg
- Salt and pepper
- Whole grain slider buns
Instructions
- Mix chicken, turmeric, cumin, breadcrumbs, egg, salt, and pepper.
- Fold in diced apples gently to avoid crumbley texture.
- Shape into 8 small patties and chill 10 minutes.
- Pan-fry or grill patties 3-4 minutes per side until cooked through.
- Toast buns, assemble with optional mustard or yogurt sauce.
- Serve immediately with pickles or slaw for crunch.
Pro Tips
-
<li Don’t overwork the meat; it keeps sliders tender.
<li A tiny drizzle of honey on the apples intensifies sweetness.
<li Use a meat thermometer to hit 165°F for safety without drying out.
Easy Variations
-
<li Swap apple for pear and add blue cheese for a gourmet twist.
<li Use turkey instead of chicken for a lighter option.
<li Add a smear of mustard-aioli for tang.
Mistakes To Avoid
-
<li Overstuffing buns; creates soggy, fallen-apart sliders.
<li Under-seasoning; sliders need bold flavor in every bite.
<li Skipping resting time; patties shrink when they cool.
Serving Ideas
- Pair with a crisp pickle relish.
- Offer a side of baked sweet potato wedges.
- Set up a mini sliders bar with toppings for guests to customize.
7. Provolone-Stuffed Mushroom Caps That Look Like Fancy Appetizers
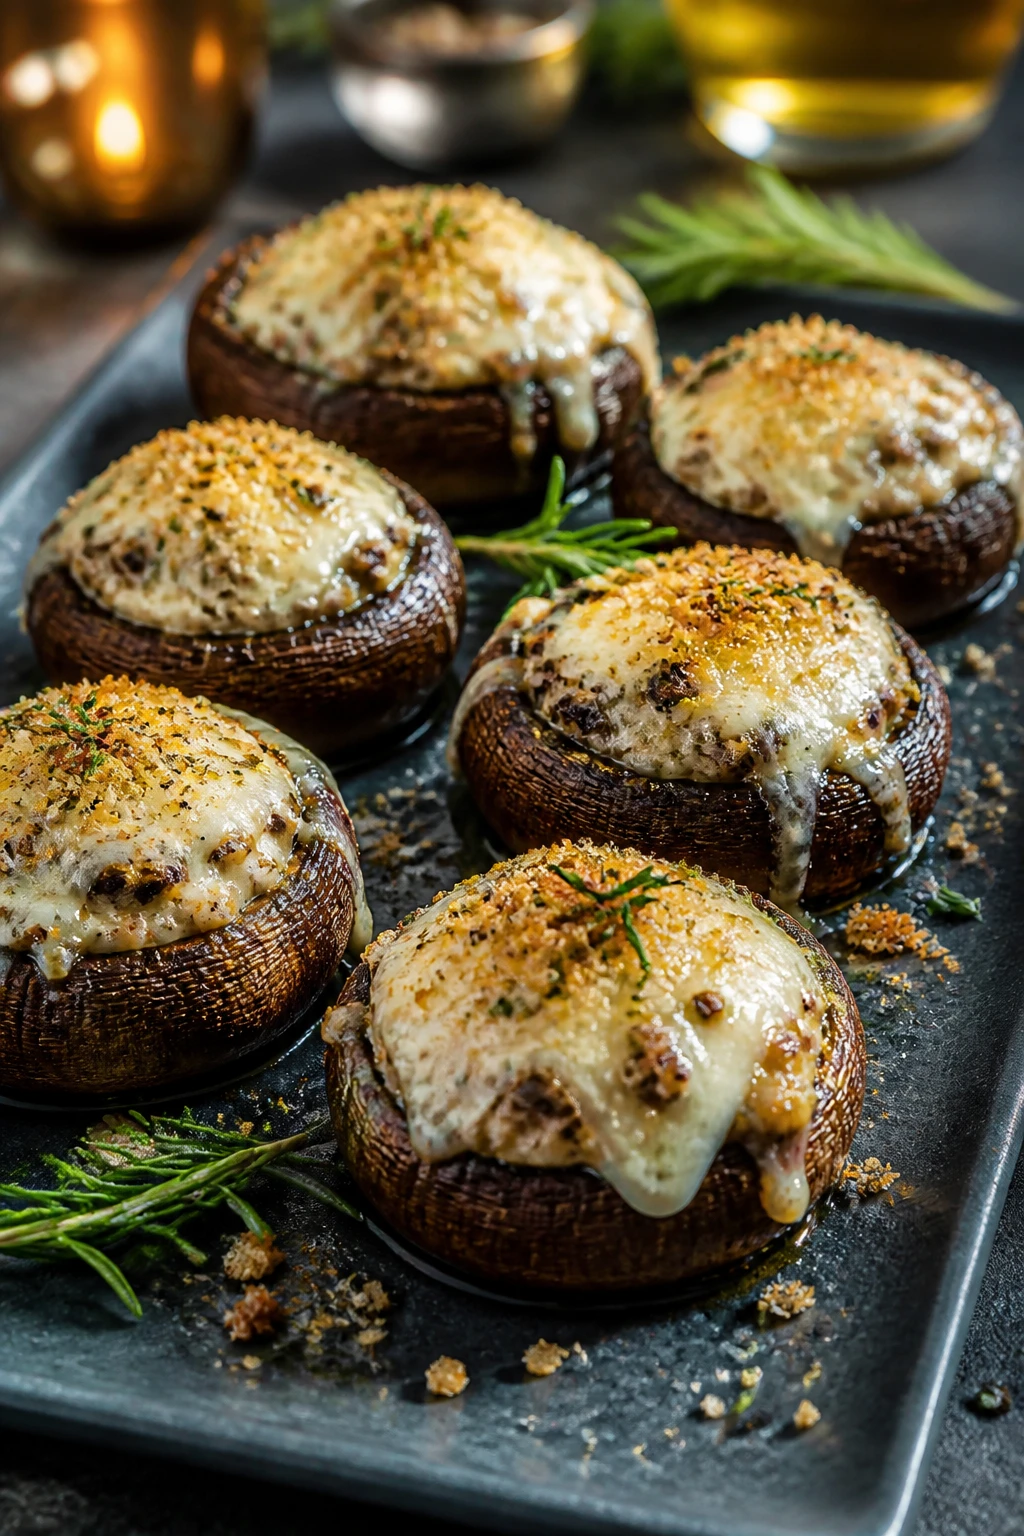
Juicy mushroom caps filled with melty cheese and protein-packed bits feel decadent but stay elegant and easy. The richness of provolone melts into the mushrooms, releasing a savory, almost meaty fragrance that makes you forget you’re eating healthy. They’re the kind of starter you pull out when hosting and your guests demand seconds.
Why You’ll Love It
-
<li Rich, cheesy center with earthy mushroom savor.
<li Vegetarian-friendly protein bump when you use lentils or quinoa.
<li Looks sophisticated on a platter with optional herb oil drizzle.
<li Simple to assemble, minimal cleanup.
<li Great as a party bite or elegant side dish.
<li Freezer-friendly if you cook in advance and reheat gently.
Ingredients
- 12 large cremini mushrooms, stems removed
- 1/2 cup finely chopped mushrooms stems (reserve)
- 1/2 cup grated provolone
- 1/4 cup breadcrumbs
- 2 tbsp minced shallots
- 1 clove garlic, minced
- 2 tsp olive oil
- Salt and pepper to taste
Instructions
- Preheat oven to 400°F. Lightly oil a baking sheet.
- Sauté chopped stems, shallots, and garlic in olive oil until golden.
- Stir in breadcrumbs and cook 1-2 minutes; season well.
- Stuff mushroom caps with the breadcrumb mixture and top with provolone.
- Bake 12-15 minutes until cheese is bubbly and mushrooms are tender.
- Broil for 1-2 minutes if you want extra blistered cheese.
Pro Tips
-
<li Use a mini spoon to stuff evenly for a neat presentation.
<li Add finely chopped spinach to the filling for extra greens.
<li Brush with herb oil after baking for gloss and aroma.
Easy Variations
-
<li Use feta and spinach for a Mediterranean twist.
<li Swap provolone with mozzarella and add sun-dried tomatoes.
<li Add pancetta bits for a smoky bite (omit for vegetarian version).
Mistakes To Avoid
-
<li Overfilling mushrooms; tops won’t close and bake evenly.
<li Undercooking mushrooms—make sure they’re tender before finishing.
<li Failing to dry the mushroom caps; moisture sabotages crispness.
Serving Ideas
- Top with a drizzle of balsamic glaze for sweetness and tang.
- Arrange on a tray with herb oil to dip.
- Pair with a light, citrusy salad for balance.
8. Crispy Chickpea Poppers That Trick Your Brain

These chickpeas get roasted to a crisp like popcorn chicken bites. They’re chewy, spicy, and incredibly addicting, with a punch of paprika and garlic. Perfect as a snack, a topping, or a party bowl that disappears in minutes. You’ll swear it’s cheat food until you check the nutrition panel.
Why You’ll Love It
-
<li Super crunchy texture that stays crisp.
<li High in plant-based protein and fiber.
<li Quick, scalable snack for crowds.
<li Endless seasoning variations keep it interesting.
<li Great for on-the-go protein boosts.
<li Budget-friendly and pantry-staple friendly.
Ingredients
- 2 cans chickpeas, drained and patted dry
- 1 tbsp olive oil
- 1 tsp smoked paprika
- 1/2 tsp garlic powder
- 1/2 tsp cumin
- Salt to taste
Instructions
- Preheat oven to 425°F. Pat chickpeas dry again for maximum crunch.
- Toss with olive oil and spices until evenly coated.
- Spread on a parchment-lined sheet pan in a single layer.
- Bake 20-25 minutes, shaking halfway, until deeply golden.
- Cool slightly before munching; they crisp as they cool.
- Serve with yogurt dip or harissa mayo for heat.
Pro Tips
-
<li Pat dry thoroughly—moisture = soggy poppers.
<li Shake the pan to avoid scorching edges.
<li Store in an airtight container to keep crunch.
Easy Variations
-
<li Add grated parmesan for a cheesy crust.
<li Dust with chili lime seasoning for a zing.
<li Mix with a handful of corn kernels for a poppable trail mix.
Mistakes To Avoid
-
<li Not drying chickpeas well enough; long bake won’t fix soggy centers.
<li Overcrowding the pan; steam ruins crispness.
<li Skipping a final crisping step for perfect texture.
Serving Ideas
- Pair with a lemony tahini dip for brightness.
- Offer a garlic-herb yogurt sauce for a cool contrast.
- Scatter with chopped parsley for color and aroma.
9. Cheesy Spinach Chicken Quesadillas That Taste Like a Cheat Night
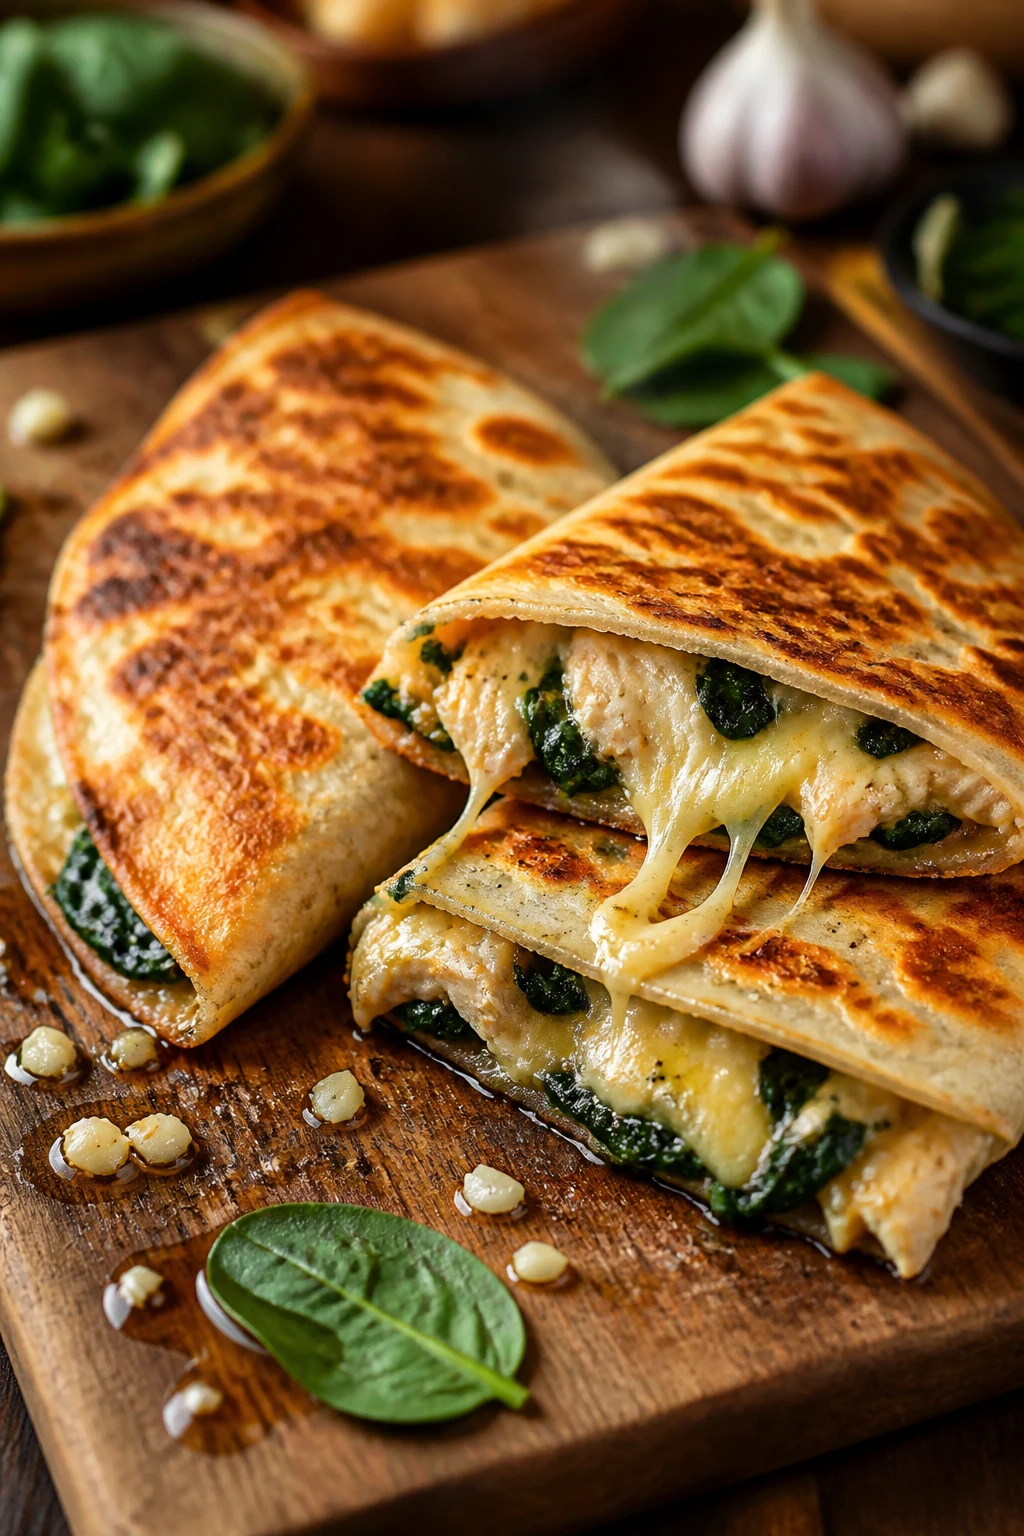
Imagine a tortilla cloaked in melted cheese, packed with juicy chicken and spinach, and kissed with a hint of garlic. These quesadillas have that irresistible restaurant vibe but come together in minutes and pack a solid protein punch. They’re go-to weeknight magic with a grilled-to-perfection edge.
Why You’ll Love It
-
<li Melty, gooey texture with a crisp tortilla shell.
<li Protein-rich filling that actually stays juicy.
<li Flexible—swap ingredients to your cravings.
<li Great for meal-prep slices or fast weeknight dinners.
<li Satisfying aroma that fills the kitchen.
<li Easy to double for leftovers without losing quality.
Ingredients
- 2 large flour tortillas
- 1 cup cooked shredded chicken
- 1 cup baby spinach, chopped
- 1/2 cup shredded mozzarella
- 1/4 cup shredded cheddar
- 1 clove garlic, minced
- 1 tbsp olive oil
- Salt and pepper to taste
Instructions
- Sauté garlic in olive oil until fragrant, add spinach until wilted.
- Stir in chicken, season with salt and pepper.
- Lay tortilla, sprinkle cheeses, add chicken-spinach mix, top with remaining cheese, cover with second tortilla.
- Cook in a skillet over medium heat 3-4 minutes per side until golden and cheese melts.
- Slice into wedges and serve with salsa or sour cream.
- Optional: add a dollop of avocado crema for extra creaminess.
Pro Tips
-
<li Use a heavy skillet to get a crisp, even sear.
<li Let the quesadilla rest a minute before slicing so cheese sets.
<li Add a handful of jalapeños if you like heat.
Easy Variations
-
<li Swap spinach for sautéed mushrooms and onions.
<li Use pepper jack cheese for extra spice and melt.
<li Add corn for a touch of sweetness and crunch.
Mistakes To Avoid
-
<li Overfilling; the filling will spill out while cooking.
<li Not heating enough—doughy texture happens if pan is too cool.
<li Skipping rest time after slicing; cheese leaks out when hot.
Serving Ideas
- Pair with pico de gallo and avocado slices.
- Serve with black bean salad for a complete meal.
- Offer a lime wedge to brighten each bite.
10. Balsamic-Glazed Turkey Burgers That Look Gourmet
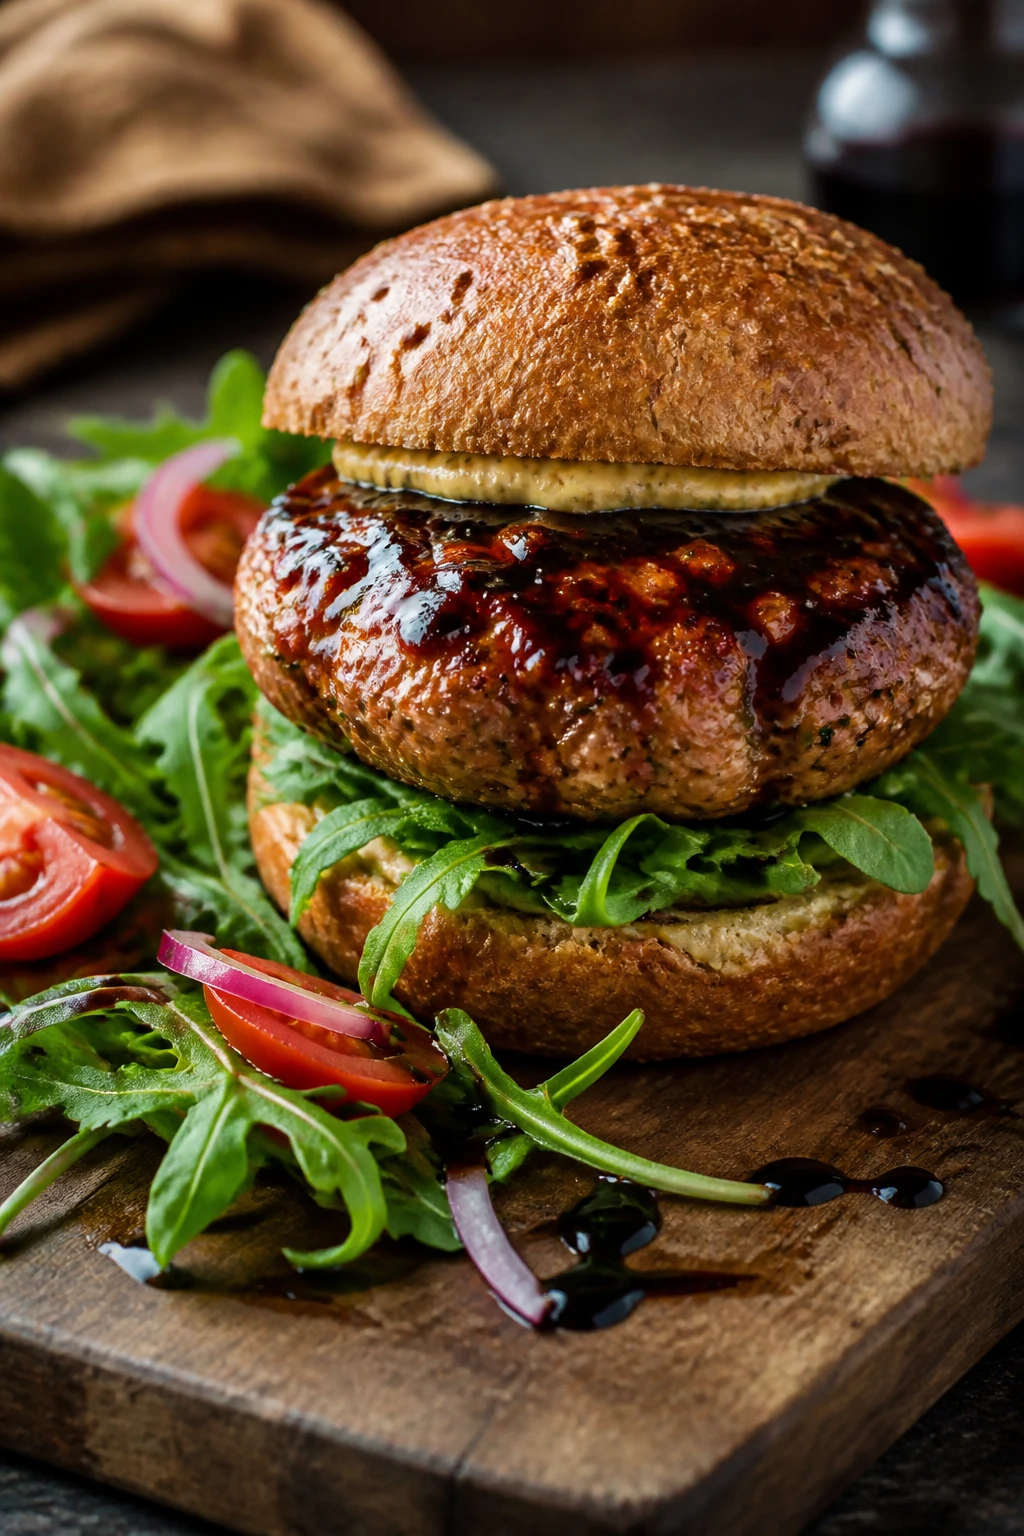
A juicy burger that looks like a splurge, but you’re anchoring it with lean turkey and a glossy glaze. The balsamic reduction adds a caramelized finish, while a bright arugula salad cut keeps things fresh. This is the kind of burger that convinces your friends you hired a chef for the night.
Why You’ll Love It
-
<li Smoky-sweet glaze elevates ordinary burgers.
<li Lean protein helps you stay on track.
<li Quick to cook and simple to accessorize.
<li Topped with peppery arugula for balance.
<li Great for grilling and outdoor nights.
<li Flexible toppings to tailor to taste preferences.
Ingredients
- 1 lb ground turkey
- 1/4 cup breadcrumbs
- 1 egg
- 2 tbsp balsamic vinegar
- 2 tsp Dijon mustard
- Salt and pepper
- 4 whole-grain burger buns
- Arugula, tomato slices, red onion
Instructions
- Mix turkey, breadcrumbs, egg, salt, and pepper; form 4 patties.
- Grill or pan-sear patties 5-6 minutes per side, brushing with balsamic glaze in the last minute.
- Toast buns and assemble with arugula, tomato, and onion.
- Spritz with extra glaze if desired and serve hot.
- Pair with a side salad or baked fries for a complete plate.
- Finish with a sprinkle of flaky salt just before serving.
Pro Tips
-
<li Do not overwork the meat; it stays juicy.
<li Balsamic glaze can burn quickly—watch it on the grill.
<li Try brioche buns for a richer bite if you’re not worried about calories.
Easy Variations
-
<li Use chicken breast for a lighter version.
<li Add crumbled gorgonzola for a bold cheese note.
<li Swap arugula for baby spinach; still peppery but milder.
Mistakes To Avoid
-
<li Overcooking burgers; they go dry fast.
<li Skipping the glaze—burgers deserve a glossy finish.
<li Not letting patties rest briefly after cooking; juices redistribute.
Serving Ideas
- Serve with chilled cucumber slices for crunch.
- Offer roasted sweet potato wedges for color and sweetness.
- Top with pickled onions for tang.
11. Spicy Soba Noodle Bowls That Don’t Break Your Diet
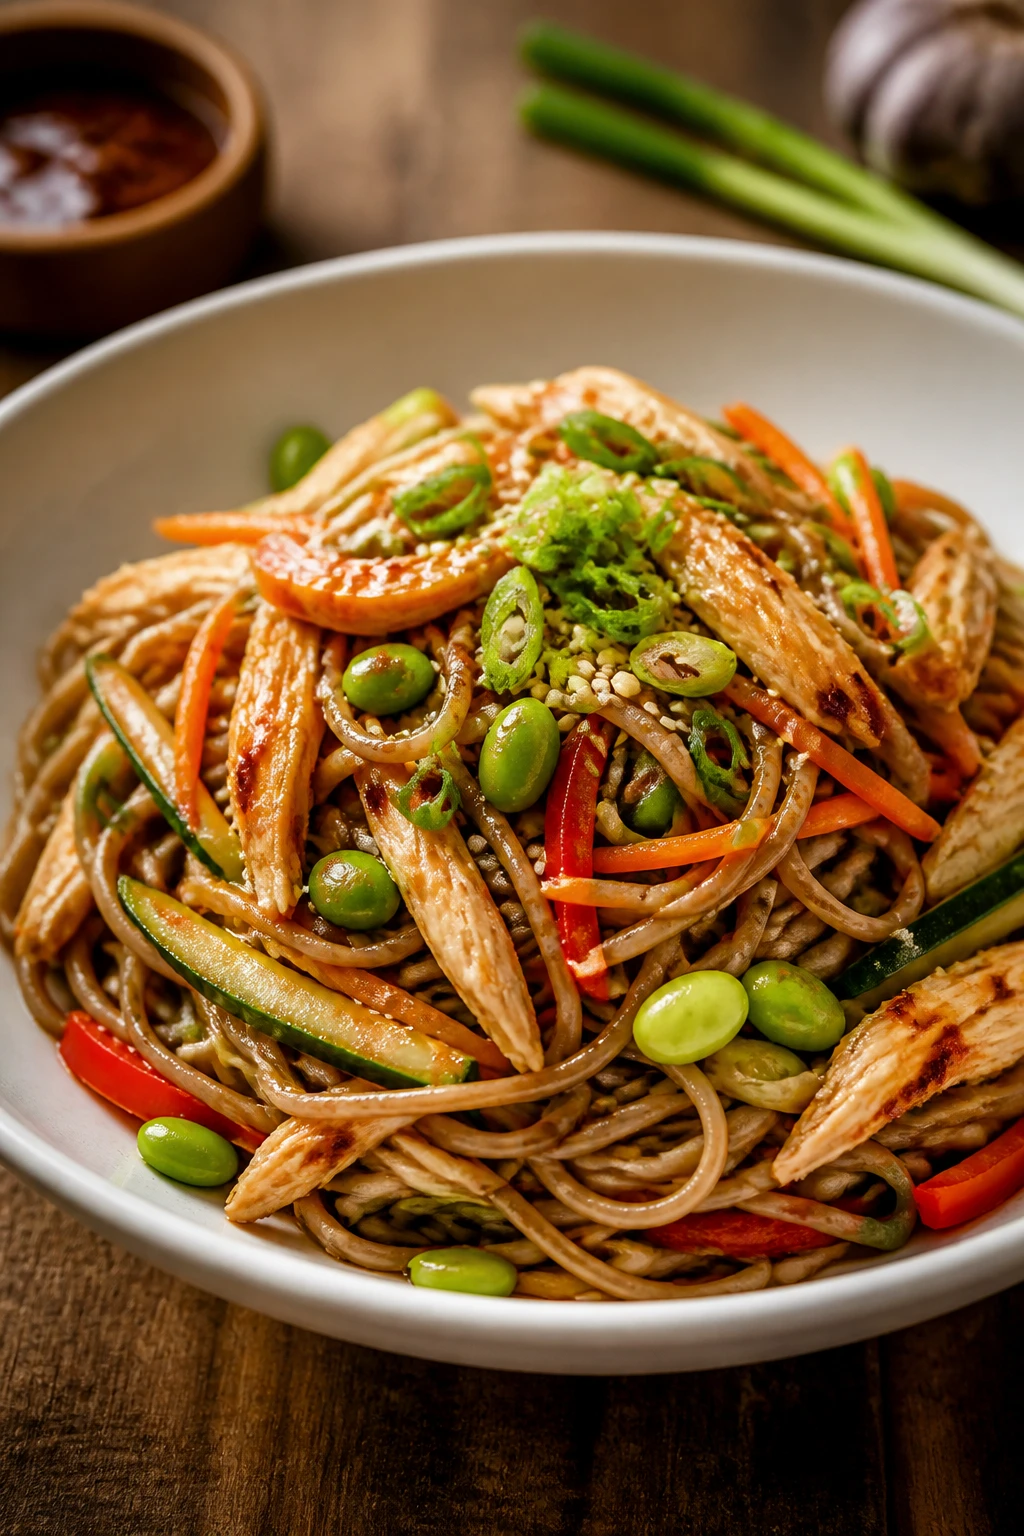
A noodle bowl that feels like a cheat but actually keeps your protein goals intact with edamame, tofu or chicken, and a punchy sesame-chili dressing. The noodles are tossed in a glossy sauce, then topped with crunchy veggies. It’s comfort, but in a bowl you won’t regret.
Why You’ll Love It
-
<li Satisfying chew from soba noodles with protein boost.
<li Zingy, sesame-chili dressing adds depth.
<li Load of crunchy veggies keeps it light and fresh.
<li Great for meal prep; flavors deepen overnight.
<li Versatile protein options to suit cravings.
<li Warm, comforting aroma that fills the kitchen.
Ingredients
- 8 oz soba noodles
- 1 cup shelled edamame
- 1 cup shredded chicken or sautéed tofu
- 1 cup mixed vegetables (carrot, cucumber, bell pepper)
- 2 tbsp sesame oil
- 2 tbsp soy sauce
- 1 tbsp chili garlic sauce
- 1 tsp honey or maple syrup
- Sesame seeds for garnish
Instructions
- Cook soba as per package directions; drain and rinse.
- Whisk sesame oil, soy, chili sauce, and honey to make dressing.
- Toss noodles with dressing, add edamame, chicken/tofu, and veggies.
- Top with sesame seeds and serve warm or cold.
- Adjust spice level with more chili sauce if desired.
- Enjoy immediately or refrigerate for later meals.
Pro Tips
-
<li Rinse soba well to avoid gummy texture.
<li Use heat-friendly veggies to maintain texture after mixing.
<li Double the dressing if you like saucy bowls.
Easy Variations
-
<li Swap chicken for shrimp for a seafood twist.
<li Add kimchi for a tangy kick.
<li Use peanut butter in the dressing for a creamy version.
Mistakes To Avoid
-
<li Overcooking noodles; they go mushy fast.
<li Skipping the rinse step, which makes the dish sticky.
<li Under-seasoning dressing; it’s the heart of the flavor.
Serving Ideas
- Top with sliced scallions and nori for an extra kick.
- Serve with a side of pickled vegetables for brightness.
- Offer a lime wedge to brighten the dish just before eating.
12. Zesty Cod Cakes With Herb Lashes That Taste Like a Seaside Escape

Cod cakes that feel luxe: flaky fish, gentle potato to bind, and a bright herb note that cuts through the richness. The crust is lightly crisp, and the interior stays tender. They’re the kind of dish you serve with a lemon-dill yogurt sauce that makes your kitchen smell like a coastal cafe.
Why You’ll Love It
-
<li Light, flaky interior with a delicate crust.
<li High-protein seafood option that doesn’t feel heavy.
<li Herbaceous aroma that wakes up the senses.
<li Sauce adds tang and coolness without overpowering the fish.
<li Great with a side salad or roasted veggies.
<li Easy to freeze and reheat without losing charm.
Ingredients
- 1 lb cod fillets, cooked and flaked
- 1/2 cup mashed potatoes
- 1 egg
- 2 tsp chopped parsley
- 1 tsp lemon juice
- Salt, pepper
- Oil for frying
- For serving: lemon-dill yogurt sauce
Instructions
- Combine cod, mashed potatoes, egg, parsley, lemon juice, salt, and pepper.
- Form into 8 patties and chill 15 minutes.
- Pan-fry in oil 3-4 minutes per side until golden.
- Serve with lemon-dill yogurt sauce.
- Finish with extra herbs if desired.
- Pair with a light salad or crunchy slaw for balance.
Pro Tips
-
<li Ensure the mixture isn’t too wet; add breadcrumbs if needed.
<li Keep patties uniform for even cooking.
<li A touch of mustard in the sauce adds a nice bite.
Easy Variations
-
<li Use salmon instead of cod for a richer flavor.
<li Add capers for a briny pop.
<li Use gluten-free breadcrumbs if needed.
Mistakes To Avoid
-
<li Not chilling the patties; they may fall apart in pan.
<li Overcrowding the pan leads to steaming, not browning.
<li Skipping the sauce—these cakes deserve a bright dip.
Serving Ideas
- Pair with a crisp cucumber salad.
- Serve on top of a pea purée for color and sweetness.
- Garnish with fresh dill and lemon zest for perfume.
13. Turkey Meatball Zoodles That Scream Comfort
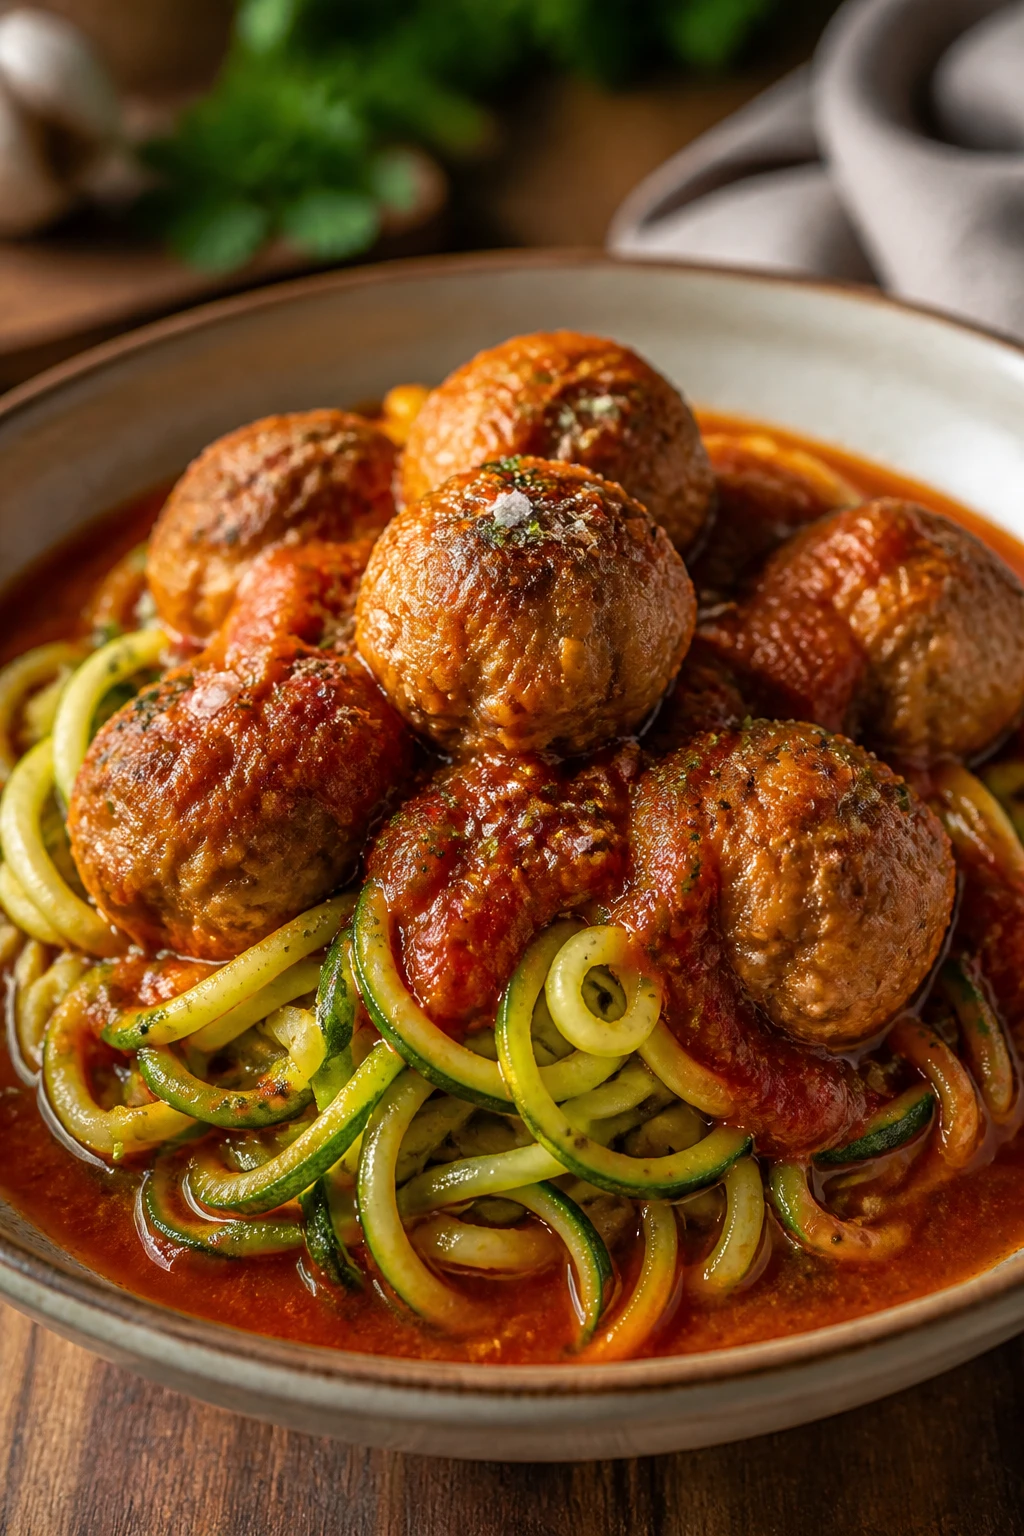
Think tender turkey meatballs swimming in a glossy tomato sauce, perched on a nest of zucchini noodles. It feels like a cheat-night pasta dish, but it’s high-protein and veggie-forward. This one’s a hug in a bowl, especially after a long day.
Why You’ll Love It
-
<li Hearty and comforting without the heaviness.
<li High protein with vegetables in every bite.
<li Simple, kid-friendly, and easy to customize.
<li Freezer-friendly for batch cooking.
<li Rich, glossy sauce coats every strand of zucchini.
<li Great as a weeknight staple or weekend treat.
Ingredients
- 1 lb ground turkey
- 1/4 cup breadcrumbs
- 1 egg
- 2 cups marinara sauce
- 2 medium zucchini, spiralized
- 1 tsp Italian seasoning
- Salt and pepper
Instructions
- Mix turkey, breadcrumbs, egg, Italian seasoning, salt, and pepper; roll into 16 small meatballs.
- Brown meatballs in a skillet 6-8 minutes, then simmer in marinara 10 minutes.
- Sauté zoodles briefly in the same pan just to soften; drain if needed.
- Plate with meatballs on top of zoodles, spoon extra sauce over.
- Garnish with parsley and a grating of parmesan.
- Serve with a side of garlic bread if desired.
Pro Tips
-
<li Add a splash of red wine to marinara for depth.
<li Don’t overwork turkey; tenderness comes from light mixing.
<li Use a julienne peeler to create perfect zoodles quickly.
Easy Variations
-
<li Use chicken for a lighter version.
<li Add chopped spinach to the meatball mix for color.
<li Swap marinara for a mushroom cream sauce for a different vibe.
Mistakes To Avoid
-
<li Meatballs that are too dense—keep mixture light.
<li Overcooking the zoodles; they turn mushy.
<li Not heating sauce long enough; it won’t cling to noodles.
Serving Ideas
- Top with a squeeze of lemon to lift flavors.
- Pair with a simple arugula salad for bite.
- Offer grated parmesan at the table for extra indulgence.
14. Mexican-Style Grilled Chicken Skewers That Sizzle
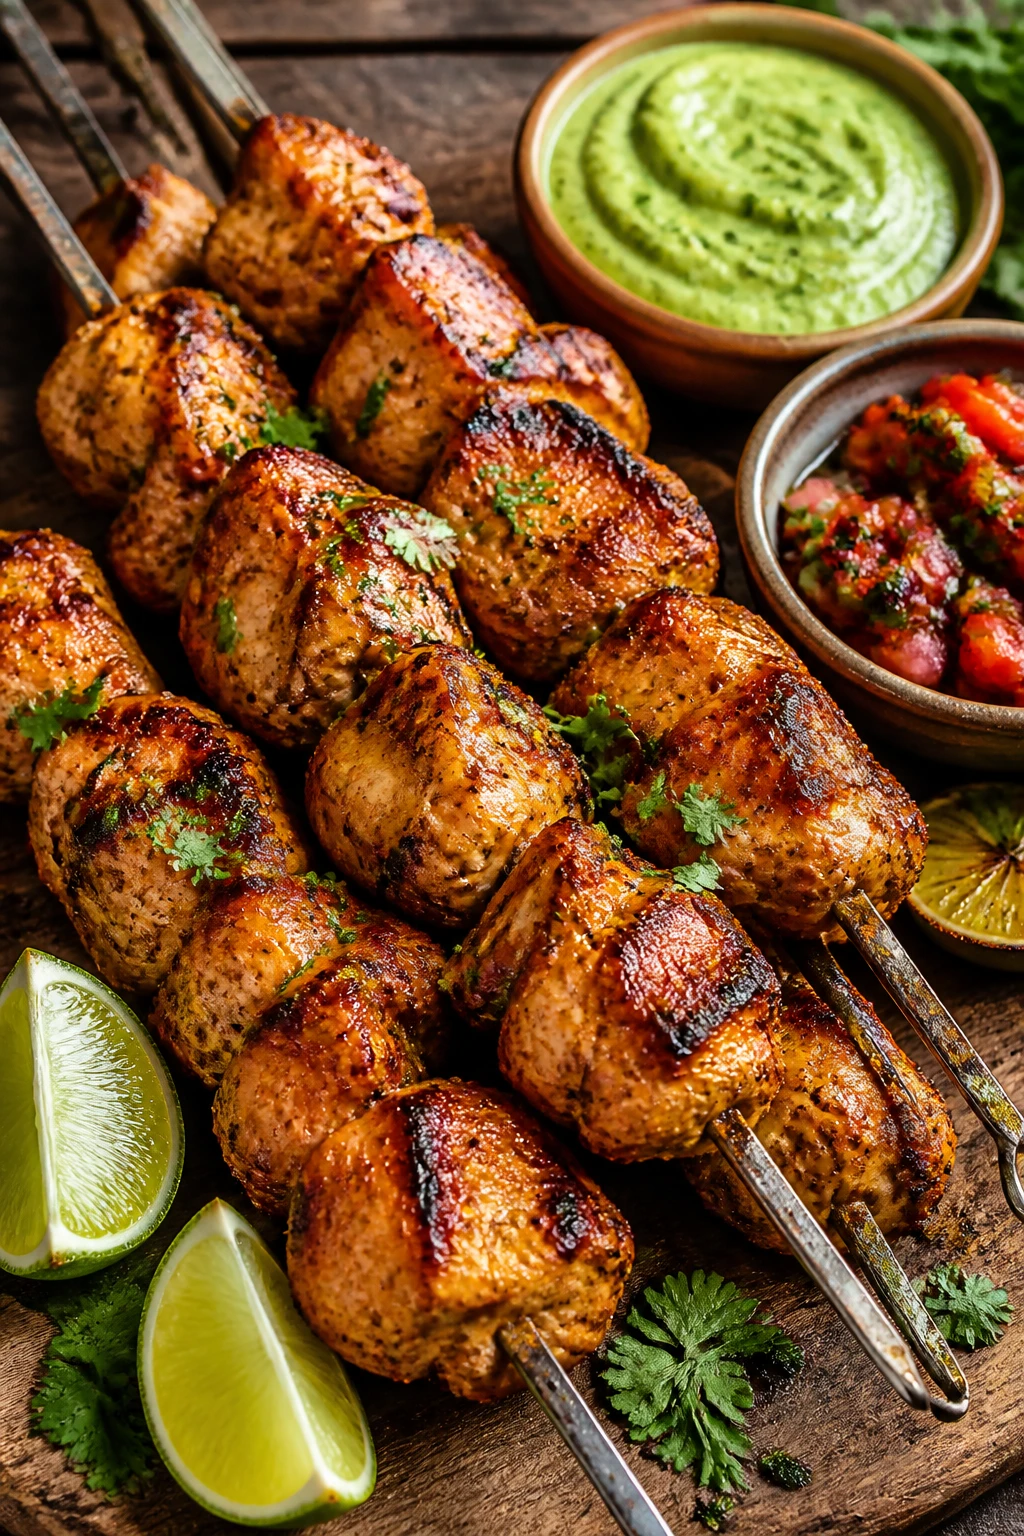
Juicy chicken cubes marinated in lime, cumin, and a hint of smoky paprika, threaded onto skewers and grilled to kiss of char. The aroma alone makes you want to drop everything and dive in. They’re fast, vibrant, and perfect with a cool avocado-dill dip or a spicy charred salsa.
Why You’ll Love It
-
<li Charred flavor without hours at the grill.
<li Lean protein that satisfies hunger after workouts.
<li Skewers make portion control easier and more fun.
<li Flexible sides: corn salad, black beans, or greens.
<li Bright, punchy marinade—simple but addictive.
<li Great for grilling season any time of year.
Ingredients
- 1 lb chicken breast, cubed
- 2 tbsp lime juice
- 1 tsp cumin
- 1 tsp smoked paprika
- 1 garlic clove, minced
- Salt and pepper
- Skewers (soaked if wooden)
Instructions
- Whisk lime juice, cumin, paprika, garlic, salt, and pepper.
- Toss chicken cubes in marinade; refrigerate 20-30 minutes.
- Thread onto skewers and grill 6-8 minutes, turning until cooked.
- Serve with avocado crema or a refreshing pico.
- Rest briefly before serving to keep juiciness intact.
- Enjoy with a side of grilled veggies or quinoa.
Pro Tips
-
<li For extra sear, pat chicken dry before skewering.
<li Marinade longer for deeper flavor, up to 4 hours.
<li Use a two-zone grill to manage heat and prevent burning.
Easy Variations
-
<li Use shrimp instead of chicken for a lighter bite.
<li Add pineapple chunks for a tropical twist.
<li Swap avocado crema for a lime-yogurt sauce.
Mistakes To Avoid
-
<li Skipping marinade; you’ll miss depth of flavor.
<li Overcooking on high heat—keep an eye on them.
<li Using bamboo skewers that aren’t soaked; they’ll burn and ruin the vibe.
Serving Ideas
- Pair with a corn salad and cilantro-lime dressing.
- Offer sliced radishes for brightness and crunch.
- Plate with lime wedges for a final zing.
15. Salmon Poke Bowls That Look Like Takeout, But Healthier
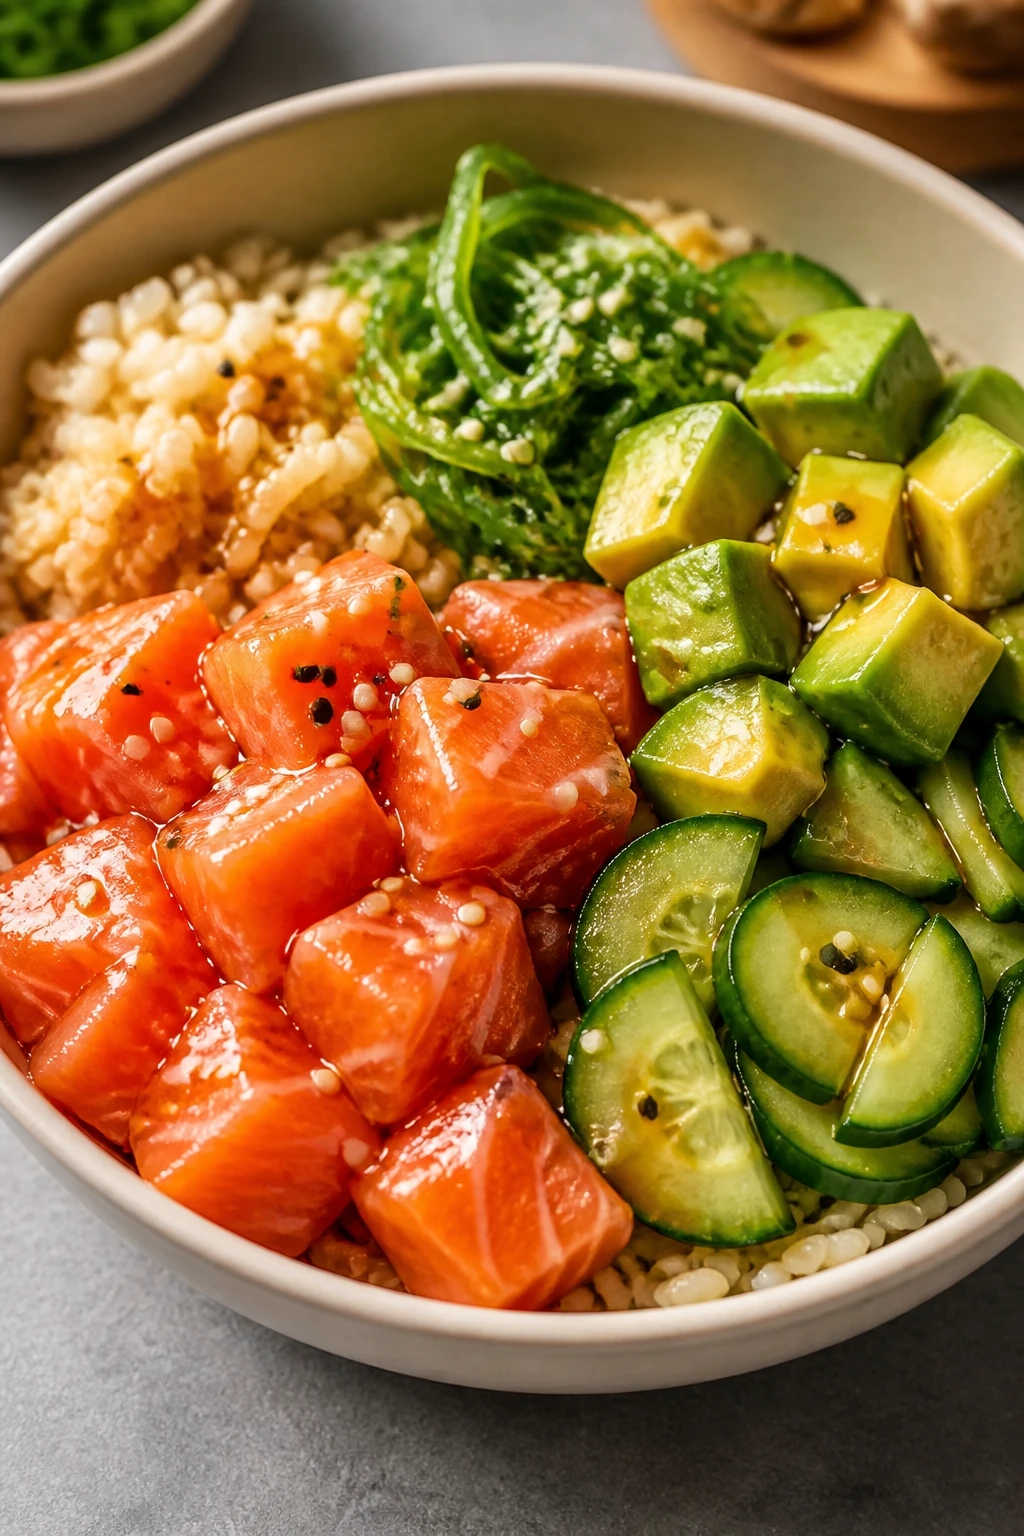
Bright cubes of salmon, avocado, and cucumber over seasoned rice or cauliflower rice, finished with a toasted sesame drizzle. It feels like a cheat meal but is built on clean protein and vibrant vegetables. If you love the “build-your-bowl” vibe, you’ll crave topping combos and the way the flavors pop together.
Why You’ll Love It
-
<li Fresh, clean flavors with a punch of sesame heat.
<li High-protein salmon with heart-healthy fats.
<li Build-your-own style makes it endlessly customizable.
<li Great for meal-prep lunches that still feel fancy.
<li Colorful, Instagram-worthy presentation.
<li Quick to assemble, especially if you pre-cook rice.
Ingredients
- 12 oz sushi-grade salmon, diced
- 1 avocado, cubed
- 1 cucumber, sliced
- 2 cups cooked brown rice or cauliflower rice
- 2 tbsp soy sauce
- 1 tsp sesame oil
- 1 tbsp rice vinegar
- 1 tsp honey
- Sesame seeds and scallions for garnish
Instructions
- Whisk soy sauce, sesame oil, rice vinegar, and honey to make the dressing.
- Divide rice into bowls; top with salmon, avocado, and cucumber.
- Drizzle dressing over bowls; sprinkle sesame seeds and scallions.
- Chill for 5-10 minutes if you want a cooler, crisper bite.
- Serve immediately and enjoy the burst of freshness.
- Optional: add seaweed salad or pickled ginger for extra zing.
Pro Tips
-
<li Use sashimi-grade salmon for the safest, best texture.
<li If you can’t find sushi rice, use quinoa for a protein boost.
<li Keep toppings separate if you’re meal-prepping to avoid soggy bowls.
Easy Variations
-
<li Swap salmon for tuna or scallops for a different flavor profile.
<li Add mango for sweetness and color.
<li Use a spicy mayo drizzle for a hot finish.
Mistakes To Avoid
-
<li Overdressing; it pools at the bottom and hides toppings.
<li Not balancing with enough veggies; bowls feel heavy fast.
<li Using overripe avocado; texture becomes mushy.
Serving Ideas
- Offer a side of miso soup to echo the poke vibe.
- Pair with a crisp cucumber salad for refreshing contrast.
- Provide chopsticks to elevate the experience.
16. Garlic-Butter Shrimp Scampi Zoodles That Fool the Eye
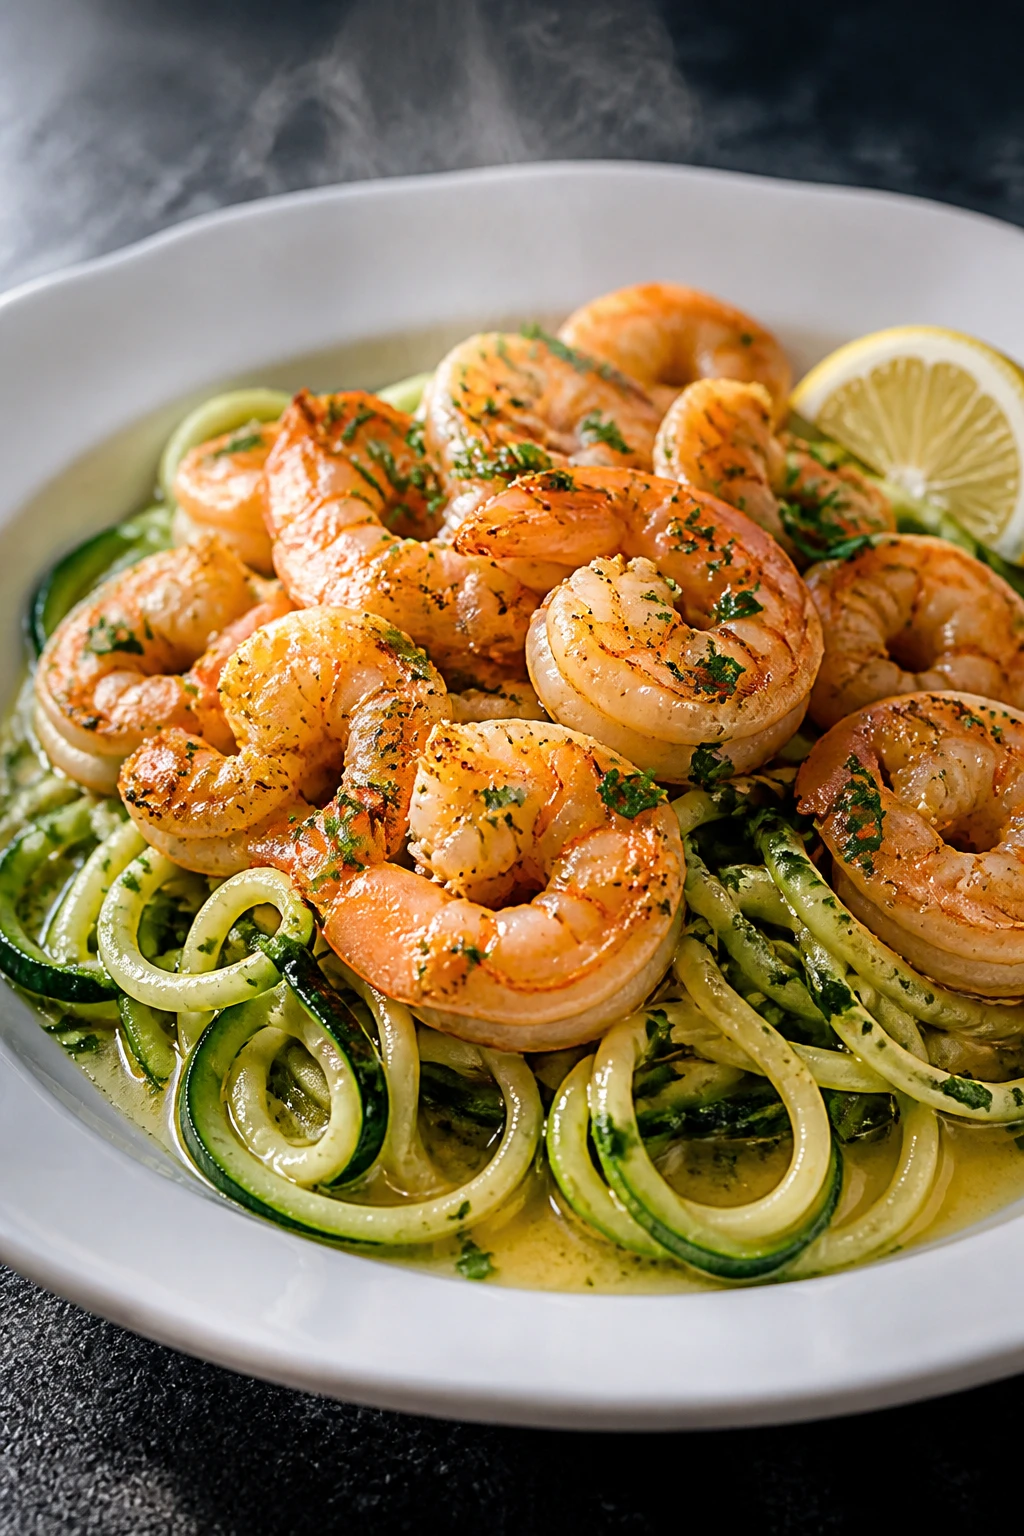
Classic scampi vibes with the light lift of zucchini noodles. Shrimp bathed in garlicky butter, a touch of lemon, and a sprinkle of parsley—this dish gives you that “chef’s kiss” moment without the heavy pasta aftertaste. It’s a discovery meal that feels like a cheat but keeps your plate lean and lively.
Why You’ll Love It
-
<li Shrimp cooks quickly and remains succulent.
<li Zoodles bring a veggie-forward base that won’t weigh you down.
<li Rich garlic-butter sauce clings to every bite.
<li Bright lemon lift makes it feel light and fresh.
<li Minimal ingredients, maximum flavor.
<li Perfect for weeknights or date-night-in nights.
Ingredients
- 1 lb shrimp, peeled and deveined
- 3 cloves garlic, minced
- 2 tbsp butter
- 2 tbsp olive oil
- 2 cups zucchini noodles
- 1/4 cup white wine or chicken broth
- Juice of 1 lemon
- Salt, pepper, parsley
Instructions
- Sauté garlic in butter and olive oil until fragrant (about 1 minute).
- Add shrimp; cook 2-3 minutes until pink and opaque.
- Deglaze with wine or broth; simmer 1 minute.
- Add zucchini noodles; toss to coat and warm through.
- Finish with lemon juice, salt, pepper, and parsley.
- Serve immediately with crusty bread or a side salad.
Pro Tips
-
<li Don’t overcook shrimp; they turn rubbery quickly.
<li If you want a thicker sauce, simmer a bit longer to reduce.
<li Use a wide pan to give noodles room to move.
Easy Variations
-
<li Add cherry tomatoes for a pop of color and sweetness.
<li Swap shrimp for scallops for a luxe texture.
<li Use gluten-free pasta instead of zoodles for a traditional bite.
Mistakes To Avoid
-
<li Blindly tossing in noodles without heating through; they cool the dish.
<li Not balancing the salt; lemon can compensate if needed.
<li Using low-fat butter that doesn’t melt smoothly—flavor matters.
Serving Ideas
- Sprinkle with extra parsley and parmesan for a restaurant feel.
- Pair with a crisp white wine or a sparkling soda for a celebratory vibe.
- Offer a side of garlic bread for those who want more decadence.
17. Italian-Style Chicken Piccata That Feels Like Comfort Food
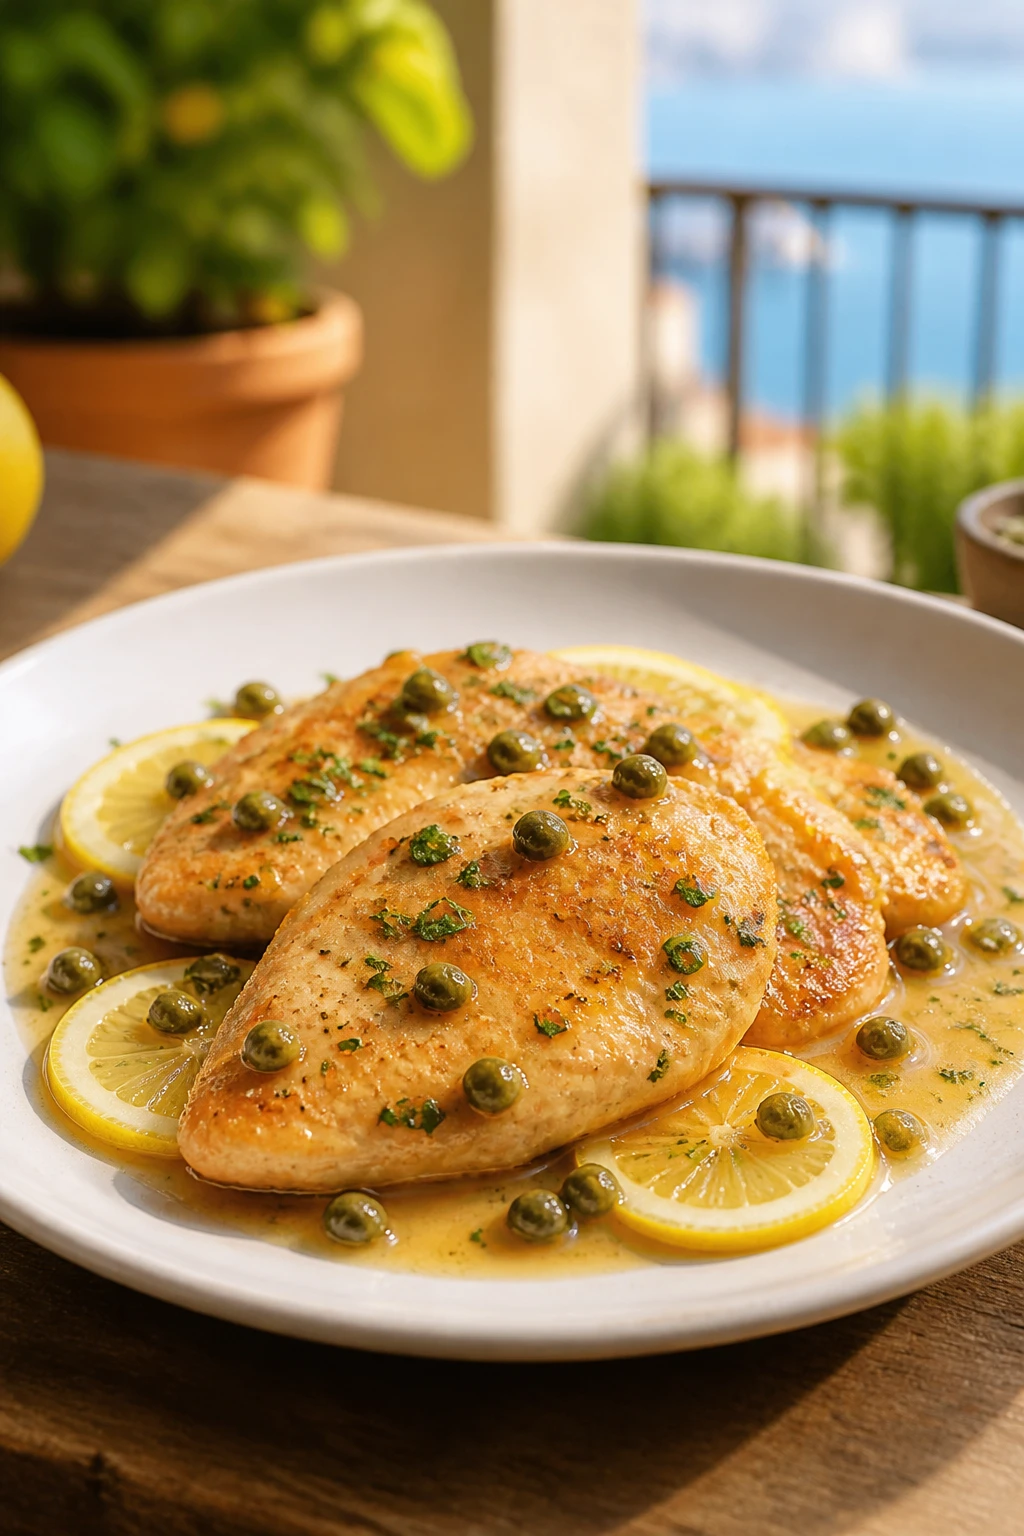
Thin-cut chicken, capers, lemon, and a silky pan sauce—this dish sings with brightness and finesse. The lightness of the piccata is deceptive; you still get good protein without loading on heaviness. It’s the kind of weeknight winner that makes you imagine a sunlit Italian balcony.
Why You’ll Love It
-
<li Bright, tangy sauce that lightens the plate.
<li Tender chicken that’s easy to pull off in under 30 minutes.
<li Capers add a salty pop that enlivens every bite.
<li Beautiful plated with minimal effort.
<li Pairs well with simple sautéed greens or pasta made from chickpeas for extra protein.
<li Leftovers taste even better the next day.
Ingredients
- 4 small chicken cutlets
- 1/4 cup flour (or almond flour for GF)
- 2 tbsp olive oil
- 1/2 cup chicken broth
- 1/4 cup lemon juice
- 2 tbsp capers
- 1 tbsp butter
- Parsley for garnish
Instructions
- Lightly flatten chicken cutlets; dredge in flour, shaking off excess.
- Brown in olive oil 2-3 minutes per side; remove from pan.
- Deglaze with broth and lemon juice, scraping up bits.
- Return chicken to pan; simmer 5 minutes with capers.
- Whisk in butter off heat and finish with parsley.
- Serve immediately with a side of greens or pasta.
Pro Tips
-
<li Pound cutlets evenly for uniform cooking.
<li Don’t overcrowd pan to avoid steaming.
<li Taste sauce and adjust lemon or salt to your preference.
Easy Variations
-
<li Use white wine in place of broth for deeper flavor.
<li Add mushrooms for an earthy counterpoint.
<li Swap lemon with orange zest for a sweeter brightness.
Mistakes To Avoid
-
<li Over-reducing the sauce to bitterness; aim for a balanced tang.
<li Not seasoning properly, especially since lemon is strong.
<li Burning garlic when deglazing—the flavor will turn acrid.
Serving Ideas
- Serve with buttered noodles or zucchini ribbons.
- Pair with a crisp, peppery salad to balance richness.
- Top with extra lemon zest for aroma boost.
18. Edamame-Crusted Chicken Drumettes That Silently Kill It
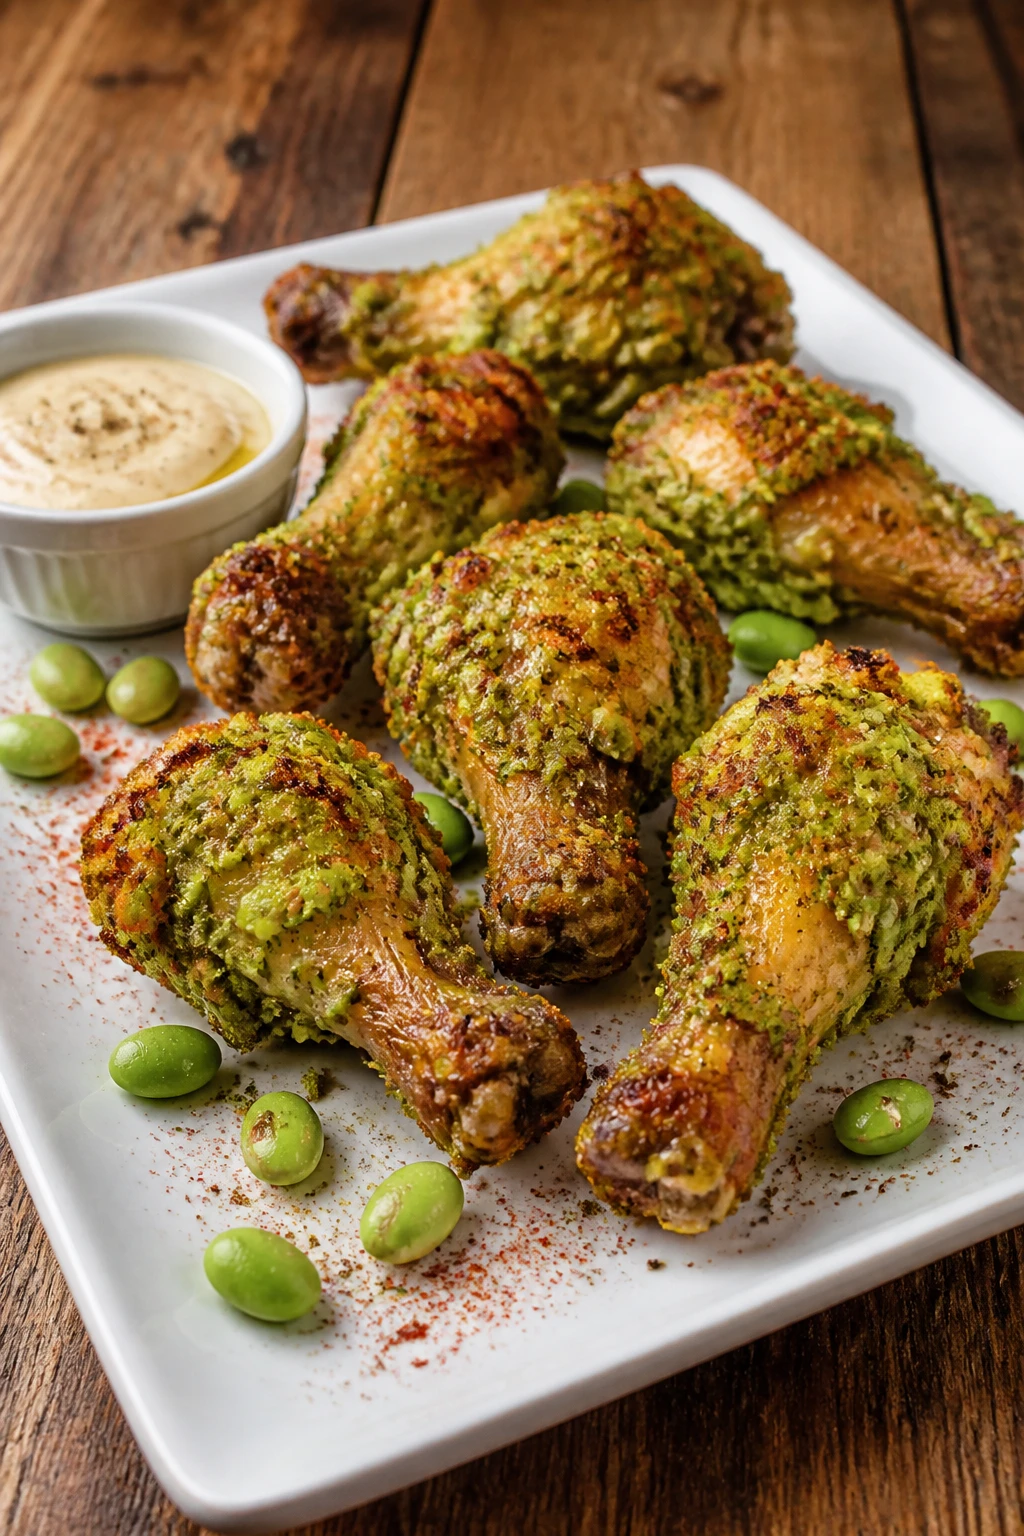
Crusted chicken with a bright green edamame shell offers a crunchy bite with a protein punch. The crunch comes from the crushed edamame, which gives a green pop and a toasty aroma. It’s a fun, playful dish perfect for parties, game days, or a playful family dinner.
Why You’ll Love It
-
<li Crunchy crust delivers a satisfying texture.
<li High-protein coating thanks to edamame.
<li Kid-friendly and easy to eat with fingers.
<li Baked version lowers mess and oil usage.
<li Quick to put together; ideal for busy nights.
<li Great as a party plate or casual weeknight meal.
Ingredients
- 2 pounds chicken drumettes
- 1 cup shelled edamame, finely chopped
- 1/2 cup breadcrumbs
- 1 egg, beaten
- 1 tsp paprika
- Salt and pepper
- Olive oil spray
Instructions
- Season drumettes; dip in egg, then coat with edamame and breadcrumbs.
- Place on a lined sheet tray; spray with olive oil.
- Bake at 425°F for 25-30 minutes, flipping halfway.
- Serve with a tangy yogurt dip or a spicy honey glaze.
- Finish with a squeeze of lemon if desired.
- Best served warm and crispy.
Pro Tips
-
<li Use finely chopped edamame for clingy crust.
<li Don’t skip the spray; it’s essential for crisping.
<li Try a lemon-garlic yogurt dip for brightness.
Easy Variations
-
<li Swap chicken with turkey drumettes for variety.
<li Use almond flour for a nutty crust.
<li Add grated parmesan to crust for extra savoriness.
Mistakes To Avoid
-
<li Under-seasoning; the crust won’t carry the flavor otherwise.
<li Not pressing crust onto chicken—it won’t stick well.
<li Opening the oven too frequently; it drops temperature and crisps less.
Serving Ideas
- Pair with a cool cucumber ranch for contrast.
- Offer celery sticks and carrots to balance richness.
- Dip into a honey-malsamic glaze for a different profile.
19. Protein-Packed Eggplant Lasagna Rolls That Look Like a Cheat

Thin slices of eggplant rolled around a cheesy, saucy filling. The rolls hold together with a satisfying bite and a melty layer of mozzarella. It feels indulgent, yet it’s clean-burning protein with a veggie twist that’s hard to resist. It’s comfort food without the heavy starch load.
Why You’ll Love It
-
<li Cheesy, comforting texture with a vegetable backbone.
<li Vegetable-forward dish that still delivers on flavor.
<li Great as a make-ahead meal with leftovers improving overnight.
<li Gluten-free-friendly if you use gluten-free lasagna sheets.
<li Balanced flavors that aren’t overwhelmed by sauce.
<li A beautiful presentation that feels fancy.
Ingredients
- 2 large eggplants, thinly sliced lengthwise
- 1 cup ricotta
- 1 cup shredded mozzarella
- 1/2 cup parmesan, grated
- 2 cups marinara sauce
- 1 egg
- Salt and pepper
Instructions
- Roast eggplant slices at 425°F for 12-15 minutes until pliable.
- Mix ricotta, egg, mozzarella, parmesan, salt, and pepper.
- Place a spoonful of filling on each slice; roll up and place in a baking dish.
- Pour marinara over rolls; top with more mozzarella.
- Bake at 375°F for 20-25 minutes until bubbly and cheese is melted.
- Garnish with fresh basil before serving.
Pro Tips
-
<li Salt eggplant slices to draw out moisture; pat dry before proceeding.
<li Use a toothpick to secure rolls if necessary.
<li Let the lasagna rest 10 minutes after baking for clean slicing.
Easy Variations
-
<li Add chopped spinach into the cheese filling for extra greens.
<li Swap ricotta with a blend of cottage cheese and parmesan for a lighter texture.
<li Use ground turkey in place of meatless filling for protein punch.
Mistakes To Avoid
-
<li Overly wet eggplant layers; they become slimy.
<li Too little sauce; rolls feel dry when served.
<li Cutting the rolls too thick; they’re hard to eat in one bite.
Serving Ideas
- Pair with a peppery arugula salad for contrast.
- Offer garlic bread on the side for a nostalgic touch.
- Top with a little chili flakes for warmth.
20. Flank Steak Fajita-Strips With Bell Pepper Glow
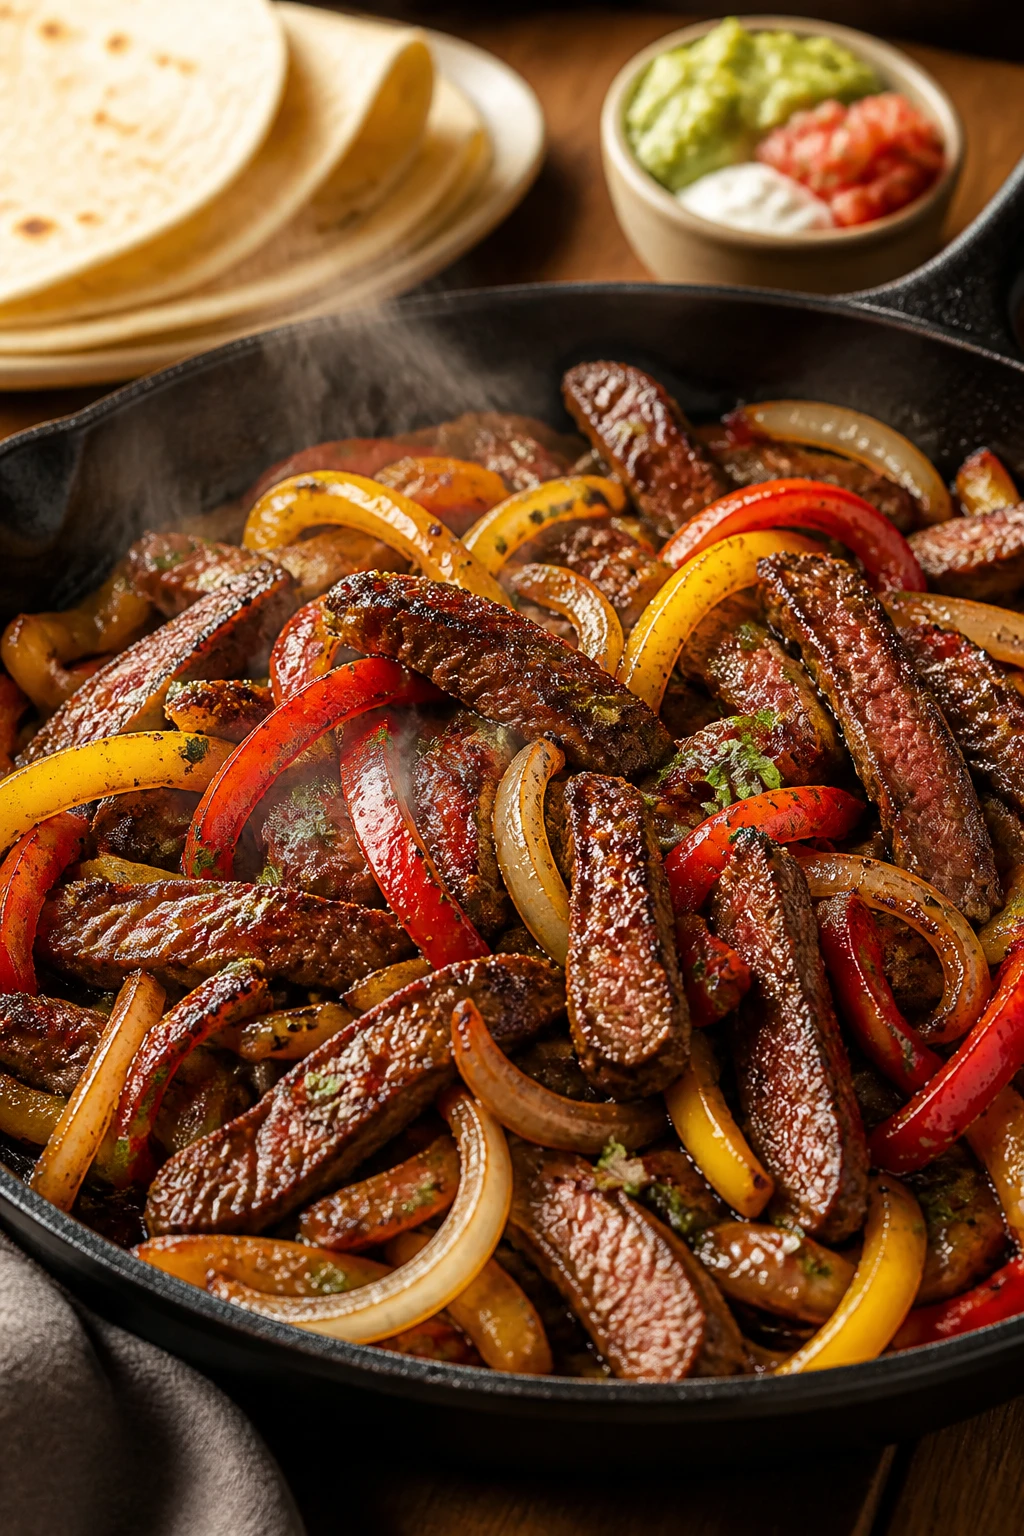
Sizzling strips of flank steak with bell peppers and onions, all dressed in a bold fajita seasoning. The aroma is intoxicating and the texture—slightly charred edges and juicy center—delivers a restaurant-worthy experience at home. It’s a feast in a skillet with a nacho-night spirit but sans guilt.
Why You’ll Love It
-
<li Succulent steak slices with bold seasoning.
<li Skillet-friendly and quick, perfect for weeknights.
<li Colorful peppers add sweetness and crunch.
<li Great for meal-prep bowls or burrito fillings.
<li The aroma alone sells the dish before you even taste it.
<li Easy to scale for crowds or family dinners.
Ingredients
- 1 lb flank steak, thinly sliced
- 1 red bell pepper, sliced
- 1 yellow bell pepper, sliced
- 1 onion, sliced
- 2 tbsp fajita seasoning
- 1 tbsp olive oil
- Warm tortillas, toppings of choice
Instructions
- Toss steak with fajita seasoning and a pinch of salt.
- Heat oil in a skillet; sear steak 2-3 minutes until browned and medium-rare.
- Remove steak; sauté peppers and onions until tender and slightly charred.
- Return steak to pan; toss to combine and heat through.
- Serve with warm tortillas and toppings like guacamole, salsa, and sour cream.
- Finish with lime wedges for brightness.
Pro Tips
-
<li Slice steak thinly against the grain for tenderness.
<li Don’t overcrowd the pan; work in batches if needed.
<li A quick squeeze of lime over top brightens the dish instantly.
Easy Variations
-
<li Use chicken or pork instead of beef for a lighter version.
<li Add jalapeños for extra heat.
<li Top with queso fresco for a softer bite.
Mistakes To Avoid
-
<li Overcooking the steak; it should stay tender and juicy.
<li Not caramelizing peppers enough; they need a bit of char.
<li Skipping the toppings that bring the dish to life.
Serving Ideas
- Pair with cilantro-lime rice for a fuller plate.
- Offer a simple corn salad to echo the fajita flavors.
- Provide warm tortillas and a selection of salsas for a DIY vibe.
21. Crispy Tofu Bao Buns That Are Pure Comfort

Golden, crunchy tofu tucked into pillowy bao buns with pickled veggies and a smoky mayo. It feels like a cheat, but it’s all about texture and mood—crisp crust, soft bun, bracing crunch from pickles, and that savory, creamy mayo. A playful, restaurant-worthy dish you can master in a single skillet.
Why You’ll Love It
-
<li Versatile protein (tofu) that soaks up flavors beautifully.
<li Bao buns provide a soft, pillowy contrast to crisp tofu.
<li Crunch from pickles adds needed tang and bite.
<li Smoky mayo gives a luxurious finish without heaviness.
<li Great as a main or a satisfying party bite.
<li Perfect for meal-prep components that come together quickly.
Ingredients
- 1 block firm tofu, pressed and sliced into 8 slabs
- 2 tbsp cornstarch
- 1 tbsp soy sauce
- 1/2 cup mayo
- 1 tbsp sriracha
- 8 bao buns
- Pickled vegetables (cucumber, carrot)
- Oil for frying
Instructions
- Dust tofu with cornstarch; brush with a little soy sauce.
- Pan-fry or shallow-fry in oil until crisp and golden.
- Whisk mayo with sriracha to make spicy mayo.
- Steam bao buns; fill with tofu, pickles, and a drizzle of spicy mayo.
- Top with extra greens if desired for color and bite.
- Serve immediately with a light salad on the side.
Pro Tips
-
<li Press tofu well to prevent soggy crusts.
<li Use a neutral oil with a high smoke point for frying.
<li If you’re grilling, brush buns with a little oil to avoid sticking.
Easy Variations
-
<li Use fried halloumi for a cheese-loaded version.
<li Try marinating tofu in hoisin for a deeper sweetness.
<li Swap mayo for cashew cream for dairy-free options.
Mistakes To Avoid
-
<li Overcrowding the pan; tofu won’t crisp properly.
<li Sloppy assembly; the bao can fall apart if overfilled.
<li Too much sauce; it overwhelms the delicate bun texture.
Serving Ideas
- Offer cucumber slices and cilantro for a fresh finish.
- Pair with miso soup for a coherent menu.
- Serve as a party platter with dipping sauces on the side.
22. Chickpea Power Flatbreads That Look Like Pizzas

Thin flatbreads built on chickpea flour, baked until crisp, then loaded with mozzarella, pepperoni (or veggie options), and a punchy marinara. They look like a cheat-night pizza but pack a higher protein punch and gluten-free simplicity. The aroma when they come out of the oven will seduce your neighbors too.
Why You’ll Love It
-
<li Gluten-free-friendly and protein-rich base.
<li Crispy crust with a soft center that mirrors real pizza texture.
<li Topped with a balanced mix of protein and veggies for color.
<li Quick to assemble; great for weeknights or entertaining.
<li Satisfying, cozy flavor that’s hard to resist.
<li Great for making a lot at once for a party or meal prep.
Ingredients
- 1 cup chickpea flour
- 3/4 cup water
- Salt to taste
- 1 cup mozzarella, shredded
- 1/2 cup marinara sauce
- Pepperoni or veggie toppings
- Olive oil for brushing
Instructions
- Whisk chickpea flour, water, and salt to form a smooth batter.
- Mist a large skillet with oil and pour in a thin layer; cook until set and lightly browned.
- Flip, brush with marinara, sprinkle mozzarella, and add toppings.
- Finish with a quick bake or cover until cheese melts.
- Slice and serve hot with extra sauce on the side.
- Top with fresh basil if you like.
Pro Tips
-
<li Batter should be thin but not runny; adjust water as needed.
<li Keep heat medium to avoid burning the crust before cheese melts.
<li Use a lid to trap heat if your pan is small.
Easy Variations
-
<li Swap marinara for a white garlic sauce for a different vibe.
<li Add a handful of olives for a briny kick.
<li Use goat cheese and sun-dried tomatoes for a Mediterranean twist.
Mistakes To Avoid
-
<li Batter too thick; crust won’t crisp properly.
<li Toppings that are too wet; they sog the crust.
<li Overbaking after adding cheese; dry edges appear.
Serving Ideas
- Pair with a simple arugula salad with lemon dressing.
- Offer extra marinara for dipping to mimic pizza experience.
- Finish with chili flakes for heat lovers.
23. Turkey-Spinach Stuffed Zucchini Boats That Shock Your Taste Buds
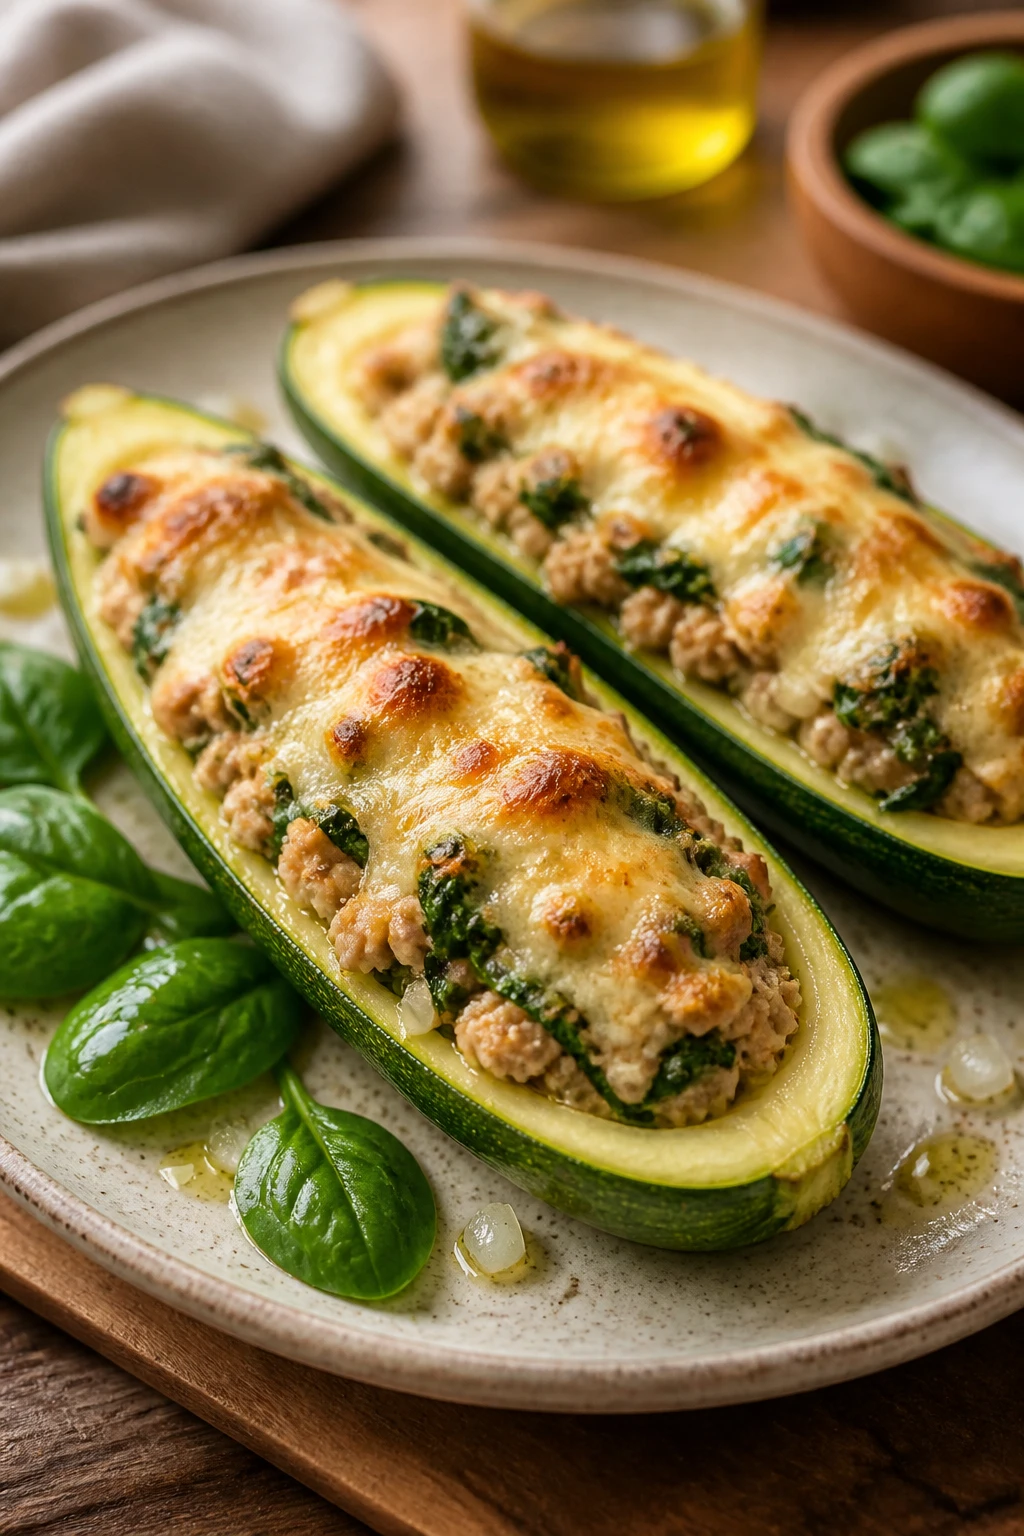
Hollowed zucchini filled with a savory turkey-spinach mixture, baked until the cheese crust glows. They look like a little boat of indulgence, but the reality is light, flavorful, and protein-forward. A cozy dinner that’s not pretending to be anything other than delicious and smart.
Why You’ll Love It
-
<li Low-carb, high-protein filling with greens.
<li Bright, comforting flavors that feel homely and indulgent.
<li Easy to portion and customize for different eaters.
<li Makes great leftovers for lunch next day.
<li Stunning presentation with zero effort.
<li Kid-friendly if you tune the spices to their taste.
Ingredients
- 4 medium zucchini, halved lengthwise
- 1 lb ground turkey
- 2 cups fresh spinach, chopped
- 1/2 cup ricotta
- 1/4 cup grated mozzarella
- 1 onion, diced
- 2 cloves garlic, minced
- Salt and pepper
Instructions
- Preheat oven to 375°F. Scoop out centers of zucchini halves to make boats.
- Sauté onion and garlic; add turkey and cook through.
- Mix in spinach until wilted, then fold in ricotta and mozzarella; season.
- Stuff zucchini boats with filling and place in a baking dish.
- Bake 20-25 minutes until cheese is bubbly and zucchini is tender.
- Serve with a light tomato sauce or a dollop of yogurt.
Pro Tips
-
<li Precook zucchini slightly to speed up the bake time.
<li Use a spoon to carefully remove centers to avoid mushy edges.
<li Add a pinch chili flakes for a gentle heat if desired.
Easy Variations
-
<li Replace turkey with lean ground beef for richer flavor.
<li Add mushrooms for more umami.
<li Use feta and olives for a Mediterranean vibe.
Mistakes To Avoid
-
<li Overfilling boats; toppings spill during baking.
<li Under-seasoning the filling; zucchini can taste bland otherwise.
<li Not testing zucchini tenderness—avoid mushy results.
Serving Ideas
- Top with fresh herbs for aroma and color.
- Pair with a light cucumber salad to contrast textures.
- Drizzle with balsamic glaze for a glossy finish.
24. Beef Bulgogi Lettuce Wraps That Taste Like a Fancy KBBQ Plate
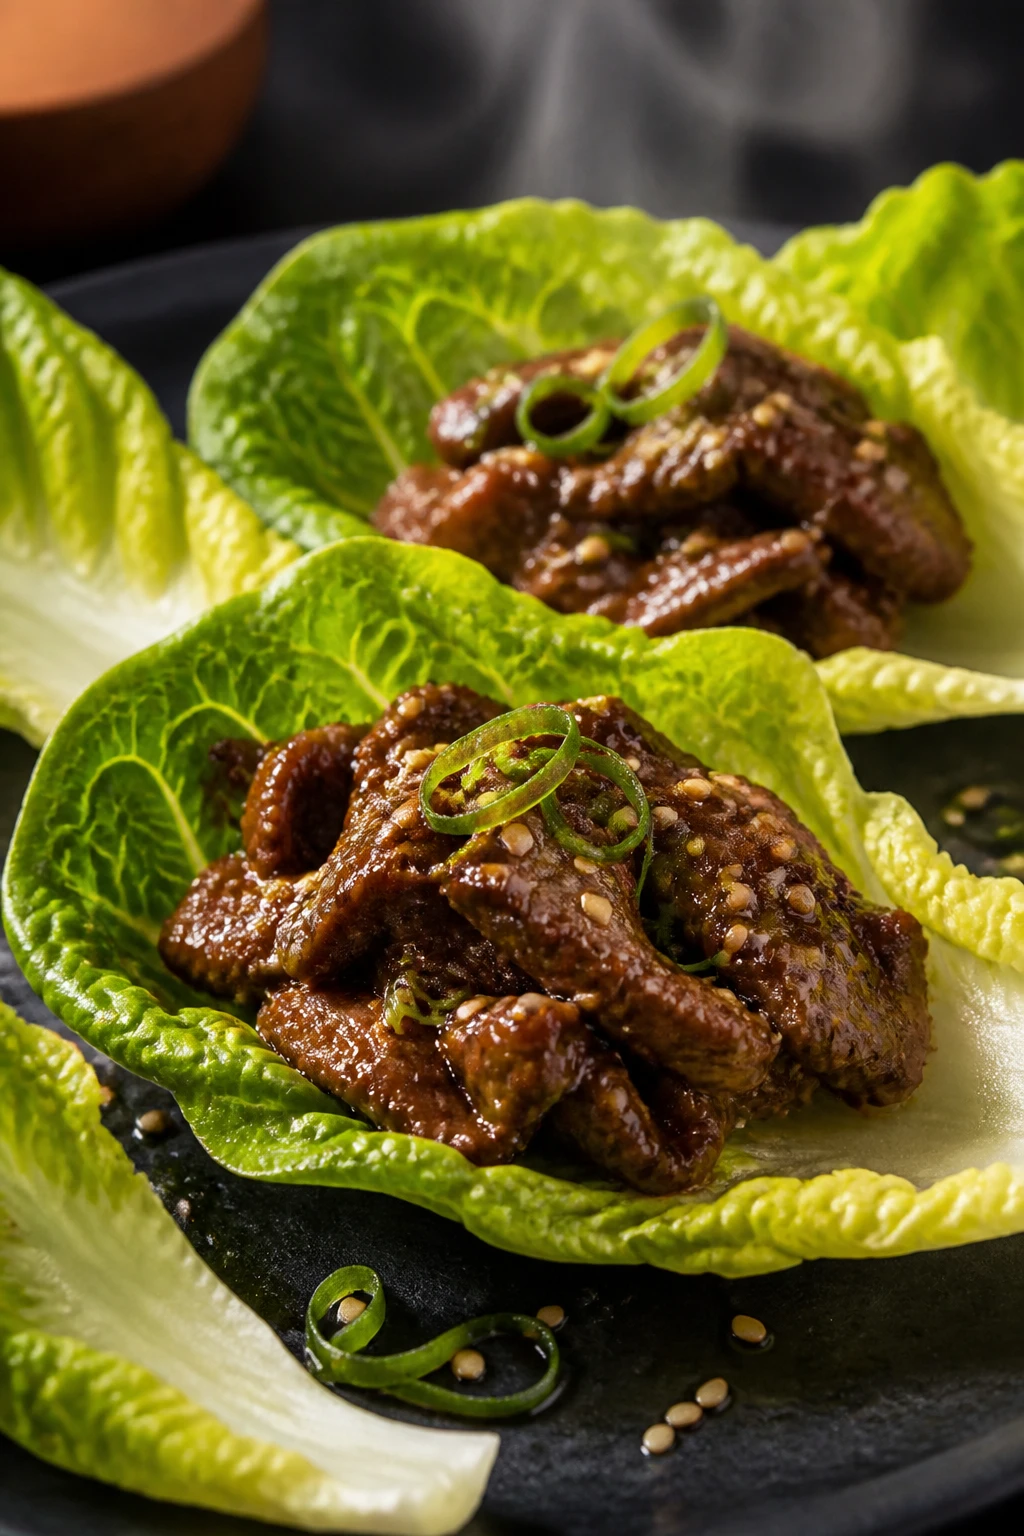
Thinly sliced beef marinated in a sweet-savory bulgogi glaze, tucked into crisp lettuce leaves. The beef is juicy and caramelized at the edges, with sesame and green onion fragrance that lingers. It feels like a cheat meal but stays clean and satisfying, perfect for a quick weeknight or a low-key dinner party.
Why You’ll Love It
-
<li Intense, balanced flavors that feel indulgent.
<li Lean beef gives you protein without the heaviness.
<li Lettuce wraps keep portions in check but still feel generous.
<li Quick to marinate and cook; weeknights become easy.
<li Great for dipping with a side of kimchi or quick pickles.
<li Flexible toppings let you customize for guests.
Ingredients
- 1 lb thinly sliced beef (ribeye or similar)
- 2 tbsp soy sauce
- 1 tbsp honey
- 1 tbsp sesame oil
- 2 cloves garlic, minced
- 1 tsp grated ginger
- 2 green onions, sliced
- Butter lettuce leaves
Instructions
- Whisk soy sauce, honey, sesame oil, garlic, and ginger to make a marinade.
- Marinate beef 15-30 minutes; heat a skillet and sear beef quickly until caramelized.
- Remove from heat and stir in green onions.
- Serve a small handful of beef in each lettuce leaf; top with extra greens or sesame seeds.
- Offer a side of kimchi or daikon pickles for brightness.
- Enjoy hot, with a squeeze of lime if you like.
Pro Tips
-
<li Slice beef very thinly for maximum tenderness.
<li Marinate briefly for extra depth; longer is fine too.
<li Use fresh lettuce for crispness and structure when wrapping.
Easy Variations
-
<li Substitute chicken for beef for a lighter version.
<li Add mushrooms for a meaty texture boost.
<li Include shredded carrot for color and crunch.
Mistakes To Avoid
-
<li Over-marinating; meat can become overly salty.
<li Not drying surface moisture; searing won’t crust properly.
<li Too much filling; wraps won’t close neatly.
Serving Ideas
- Pair with cucumber salad and rice bowls for a fuller meal.
- Offer extra sesame seeds and chili flakes for guests to customize heat.
- Provide lime wedges to brighten the finish.
25. Pistachio-Crusted Cod Fillets With Lemon-Butter Ragout
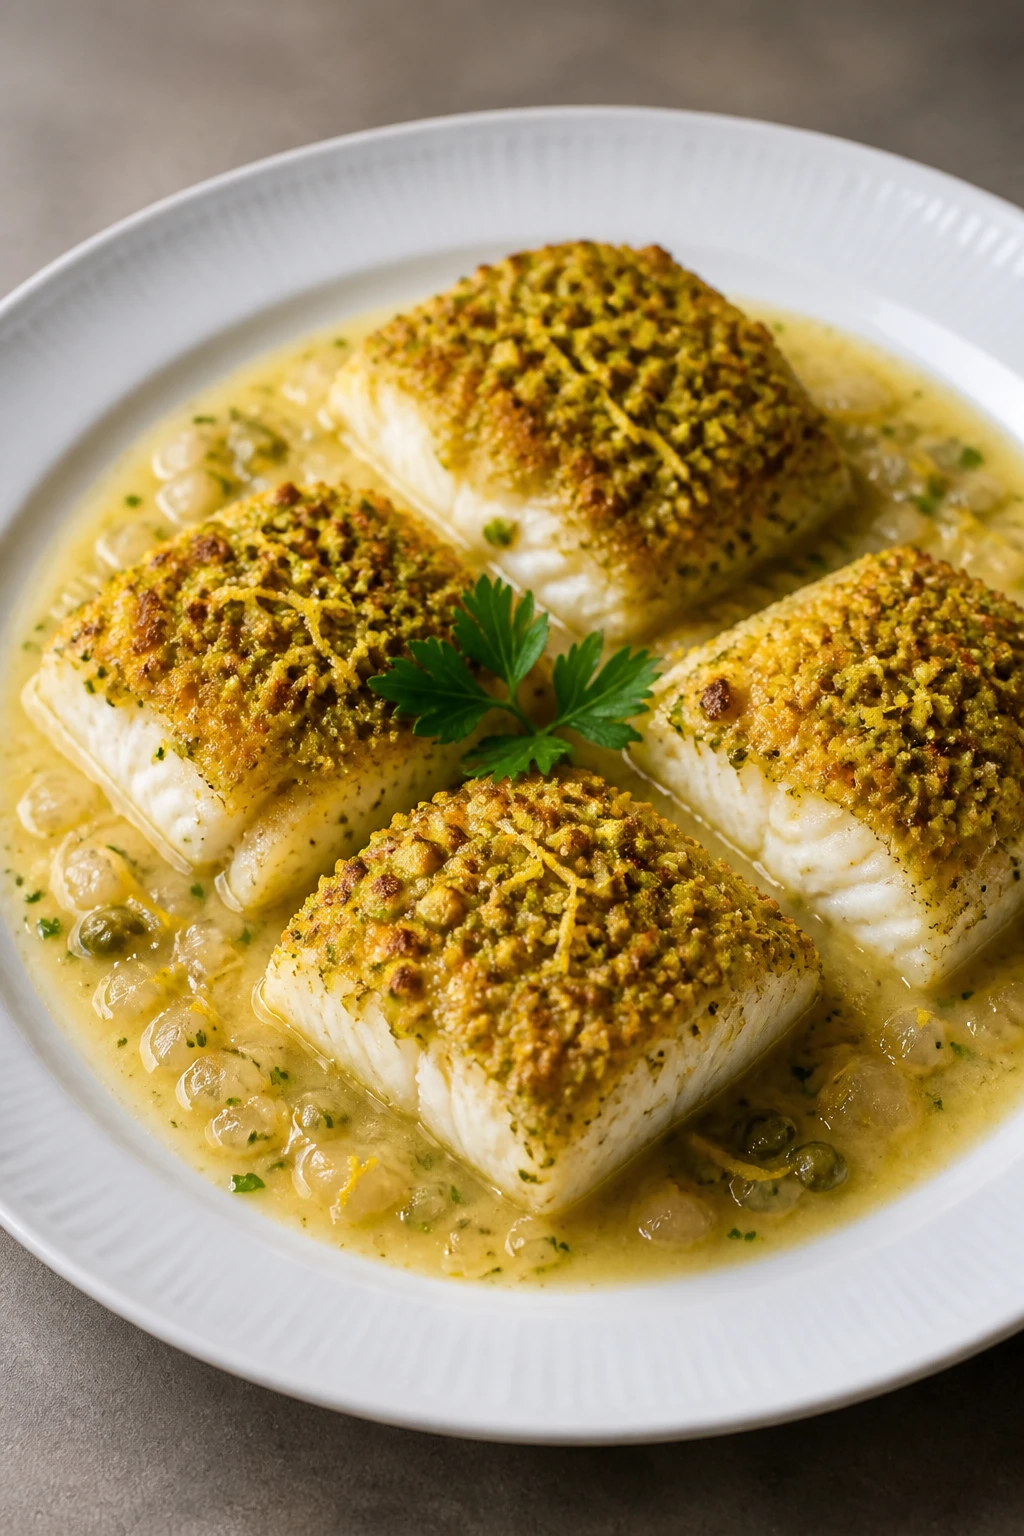
Elegant, crisp-edged cod fillets coated in pistachio crumbs, paired with a silky lemon-butter ragout. This dish feels extravagant, but the ingredients keep it approachable and bright. The pistachio crust adds a delightful crunch and a subtle nutty flavor that’s totally crave-worthy.
Why You’ll Love It
-
<li Crunchy crust gives a “wow” moment without heavy sauces.
<li Cod stays flaky and tender under a crisp shell.
<li Ragout brings a velvety finish that feels luxurious.
<li Light, aromatic, and perfect for a midweek treat.
<li Protein-forward with a refined presentation.
<li Great as a dinner party dish that’s surprisingly easy to pull off.
Ingredients
- 4 cod fillets
- 1/2 cup pistachios, finely chopped
- 1 egg, beaten
- 1/2 cup breadcrumbs
- 2 tbsp butter
- 1 lemon, zested and juiced
- 1/4 cup white wine (or extra broth)
- Fresh parsley for garnish
Instructions
- Dip cod fillets in egg, then coat with pistachios mixed with breadcrumbs.
- Pan-sear in butter until crust is golden and fish is opaque inside.
- In the same pan, add lemon juice, zest, and wine to create ragout; simmer a few minutes.
- Plate cod with ragout spooned over the top; garnish with parsley.
- Serve with a light side of greens or a small potato mash.
- Enjoy the contrast of texture and bright, citrusy aroma.
Pro Tips
-
<li Use a thin cod fillet for even cooking and crisp crust.
<li Don’t burn the pistachio coating—keep heat moderate.
<li Adjust the ragout with a touch of cream if you like a silkier sauce.
Easy Variations
-
<li Swap pistachios with almonds for a different crunch.
<li Use halved cherry tomatoes in ragout for brightness.
<li Try salmon for a richer crust.
Mistakes To Avoid
-
<li Overcrowding the pan; crust won’t form properly.
<li Not warming ragout enough; it tastes flat with cold fish.
<li Using dull knives to slice; you want a clean fillet edge for a neat crust.
Serving Ideas
- Pair with roasted asparagus or a petite herb salad.
- Finish with a light parsley oil for a glossy finish.
- Serve with a chilled white wine to accent citrus notes.
Frequently Asked Questions
Q: Are these meals truly high protein without sacrificing flavor?
A: Absolutely. Each recipe centers on lean proteins, legumes, or seafood, with smart carb choices and satisfying fats to create balanced meals that still feel like a treat.
Q: Can I customize these recipes to fit a vegan or dairy-free diet?
A: Yes. Many recipes can be adapted with plant-based proteins, dairy-free cheeses, or yogurt alternatives. I’ve noted variations where appropriate, but you’ll find plenty of room to experiment.
Q: How do I meal-prep these without losing texture?
A: Prioritize ingredients that hold up well when reheated (like chicken, shrimp, or tofu) and store sauces separately to avoid soggy textures. Reheat gently to preserve crispness where possible.
Q: Do these require special equipment?
A: Not really. A good skillet, a sheet pan, a sharp knife, and some basic tools will handle most recipes. A spiralizer or a mandoline can help with veggie cuts, but they’re optional.
Q: How can I keep sauces from separating or clumping?
A: Use emulsifiers like a touch of mustard or yogurt where appropriate, bring dressings together with a whisk, and avoid boiling delicate sauces. A little heat management goes a long way.
Q: Are there budget-friendly options among these?
A: Yes. Several rely on affordable proteins (chicken, turkey, beans) and pantry staples. I’ve highlighted some budget-friendly swaps in variations.
Q: How do I prevent leftovers from drying out?
A: Reheat gently, portion properly, and keep sauces separate until serving. Some proteins reheat better with a splash of broth or a fresh squeeze of lemon.
Q: Can I freeze these meals?
A: Many stand up well to freezing, especially meatballs, patties, and baked items. Wrap tightly, label, and reheat with care to preserve texture.
Q: What is the best way to plate these for maximum crave factor?
A: Think color, height, and texture contrast. A crisp garnish, a drizzle, or a fresh herb scatter turns a simple plate into a crave-worthy feast.
Final Thoughts
These 25 high-protein meals that look like cheat meals prove you can have your indulgence and your macros too. The key is texture, flavor, and a little kitchen swagger. Pick a few you’re itching to try—then rotate through the list, savoring the journey from bite-one to finish. You’ve got this, chef—let the flavor fireworks begin.
What Surprised Me Most About This Recipe
How a simple crust or glaze can transform a dish from everyday to “wow” while keeping the protein in check. It’s all about texture and aromatics—the small details make the biggest difference.
The Secret Ingredient Nobody Expects
A pinch of citrus zest or a splash of miso can unlock depth in sauces without wrecking macros. Don’t overlook a tiny addition—it’s the spark that makes the dish memorable.
Why This Recipe Works Better Than Most Versions
Because it focuses on real ingredients, balanced macros, and a playful presentation that feels indulgent. Every step is designed to maximize texture and aroma, not just shove protein onto a plate.
Reader Favorite Tip
Prep components ahead of time, then assemble with a few quick moves. It cuts down cooking time and keeps the experience relaxed rather than rushed.
The Biggest Mistake People Make
Trying to mimic cheat meals exactly without considering protein balance. You don’t have to choose—make the flavor bold and the protein punch strong, and you’ll never miss the cheat.
Leave a Reply